Without Any Plugin
Did you know that a normal website gets most of its weight from the images used in it? It is true. The majority of website size is mostly because of the images used in its pages.
Optimizing images without losing quality is a difficult task for average bloggers. Most of them don't know how to do that.
WordPress is the most widely used blogging platform by bloggers. Did you know that when you upload an image to WordPress, it creates 4 different sizes of the same image?
Today we will share a sneaky little trick to compress and reduce the size of images that can be used on your website and blog pages. Do note that you heard it first on UnderWP.
Why compress and reduce the image size?
Before we dive into the trick, it is important to know the importance of small-sized images on a website. Btw, it's very important.
Yes, size definitely matters when it comes to images. The smaller the image file size, the better it is for a website.
The small size of images helps the page load faster. A very important factor in user experience for a visitor.
Small images also help in ranking pages of the website in search engines like Google and Microsoft Bing. Because when a Googlebot can load your pages faster, it gives a point to the website that can improve the SEO rankings.
Core web vitals have become an important ranking factor since 2020 for Google. It is an important ranking factor for any website that wants to move on top of Google rankings.
One of the important factors in core web vitals is the fast loading of a page including all its images. And when the size of an image is small and loads faster, it gives a positive rating in the calculation of core web vitals of that page.
Trick To Compress Images Online For Free
This is a simple trick where we will upload the images we want to use on our website to Facebook. Yes, we will be using Facebook's servers to do the reduction job for us.
No complicated software, paid plans or WordPress plugins to do this job. It is as simple as uploading and downloading images from Facebook.
But we play it smartly and use some tweaks with which it will be easy to manage huge uploads too without notifying your friends on Facebook.
Let's see in a real example how we do it for our blog too.
Step 1: Sign in to your Facebook account.
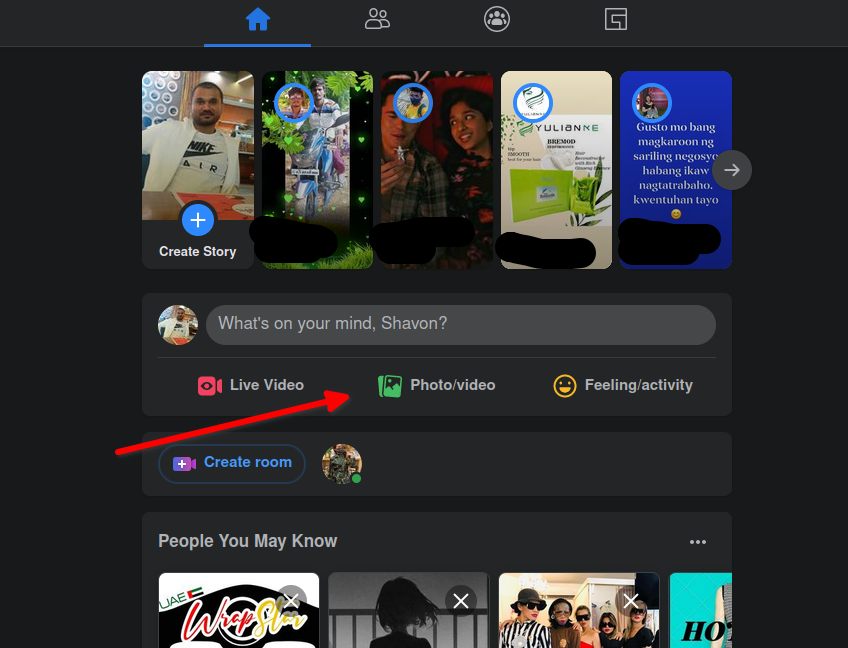
If you don't have a Facebook account, it is time to create one just for this purpose. But if you have already, then sign in and go to home, which is the default page that opens up after logging in.
Step 2: Upload your images.
You see a button called Photo/Video. Click on it and upload the images that you want to reduce the size for.

Do not press the Post button yet.
Step 3: Setting the visibility
If your account is just a trial account or something that you don't use much then you can go ahead and post the images we uploaded above.
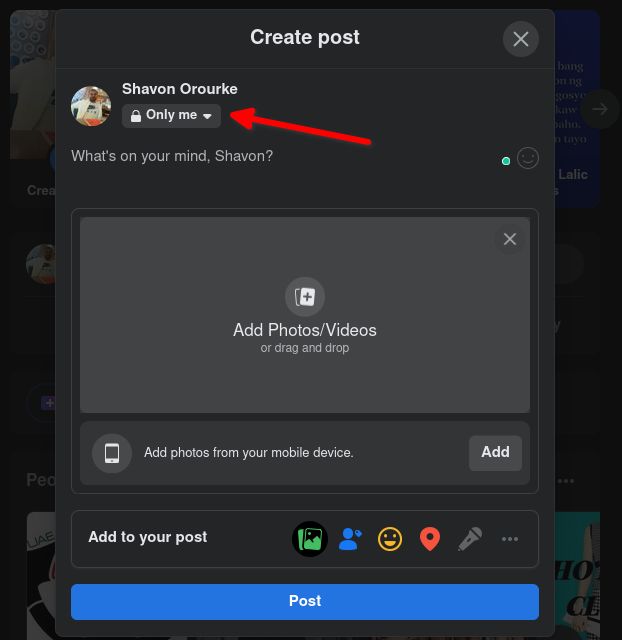
But if you do not want to show your images to everyone on Facebook, then click on the audience button below your name.

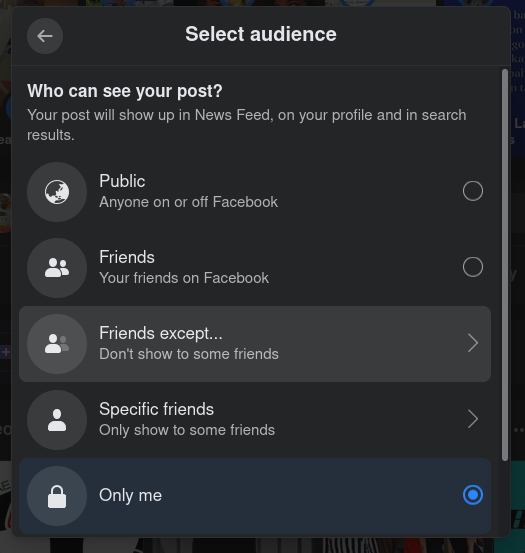
When you press that link as shown in the above image, it will open the options that can be selected.

As you can see, there are many options to select from. I usually go with the Only me option. It will only show the uploaded images to me on my profile and Home.
Press the Post button at the bottom when you are ready with all the images that need to be reduced in size.
Step 4: Download the compressed images
When you press the Post button, the image gets uploaded to Facebook servers and then shows up as the first post on your Home feed.
Click on the images you just uploaded.

A gallery will pop up with the image you upload. We uploaded the featured image of this post.
Right-click on the image and save it by clicking the Save image as.. option.
With this, you have got your images size reduced for free using Facebook servers. There is no loss in the quality of the images too.
You cannot see much difference between the original image and the compressed image from Facebook.
Step 5: Delete the uploaded image from FB
You got a small size image reduced using FB servers. Now it is time to delete them from your account.
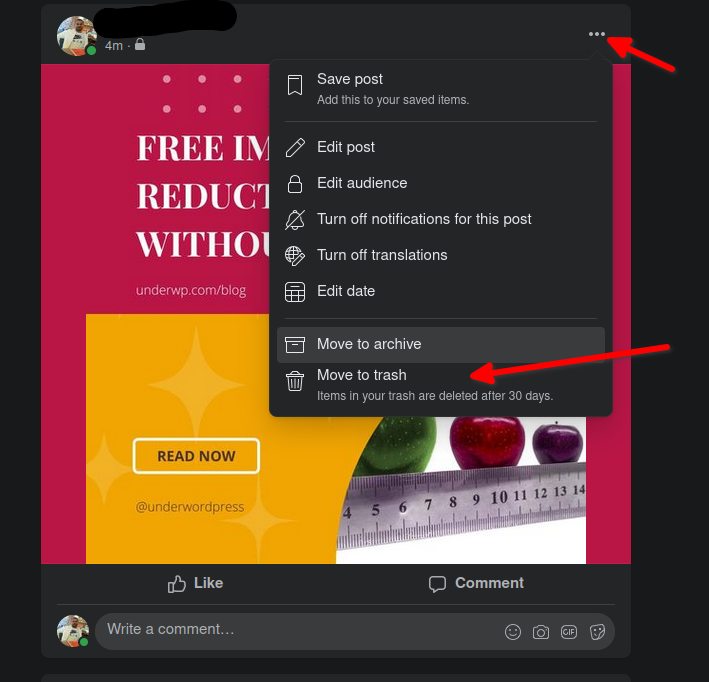
Click on the top right corner of the post of the image we just uploaded and select the Move to trash button.

This will open a popup asking for confirmation before moving the images to trash. Select the Move button.
Now you have successfully moved your images to trash. These images will automatically be deleted from the Facebook server after 30 days.
No WordPress Plugins Required
With the trick laid above, you do not need a special plugin in WordPress to reduce your image size. The Facebook server is quite good at doing that free of cost.
The quality of the image is of less quality but we can put it as a no loss reduction. Every size reduction technique has some loss in quality. But here we are losing a very minute quality for a good gain in the size reduction.
It is a fair takeaway I say. As you gain a free image reduction and improve the speed of your website pages.
Now, when you upload these small-sized images to your WordPress, it will convert into 4 other sizes that will also be of the same quality and size.
We found a 50% to 70% size reduction in the image size with this technique. This is a huge difference in image sizes.
In our example, we used the featured images of this post. Its original image size is 323.2KiB. Here is the original image.

After downloading it from Facebook, its present size is now 81.4KiB. That is a whopping 75% image size reduction. Mind-blowing, isn't it.
This technique of reducing the image size is not helpful for the images that have already been uploaded to your WordPress media. But you can start implementing it now and make your media images smaller in size.
Now there is no need to install plugins for WordPress or any other CMS that charge a heavy price for reducing the size of images. Through this trick, you can reduce the size of any image for free.
Fewer plugins are less work for your CMS and that helps in faster page speed.
This is manual work, but it's worth it if you are a regular blogger or use a lot of images on your website pages. After a while, you will see that these compressed images help in reducing the web page size and overall the website file size.
Final Words
Having a small page size is very helpful in SEO. And images carrying less size helps in reducing the size of the page to a great extent.
Now you do not need to depend on an external server, software or a plugin to reduce the image sizes. Use Facebook's powerful server to get reduced image size with no loss in quality.
We tried other free social networks like Instagram, Whatsapp, etc. But we found that the greatest reduction of images was best in Facebook.
So here we are disclosing one of our secret technique to reduce the image sizes for free.
If you like this trick, do share it with others and comment below to let us know how it helped you reduce the image size in your case.


Very nice trick to compress image sizes for free using facebook. Helps bloggers who are beginners and don’t want to spend money for online image resizers.
But you cannot reduce the size of existing images on your WordPress website. But still a helpful image size trick.