Hosting a WordPress website can be an expensive thing if not done properly. It can go from just a few dollars to thousands of dollars a month.
Finding WordPress hosting can be a difficult task. If you own a small blog or website that you do not update often then free hosting can be very useful.
There are different types of hosting companies and plans for every kind of website. Hosting companies offer plans for shared hosting, VPS, and dedicated servers. Based on your website traffic and size these plans will fit you.
We are not writing or listing different hosting companies in this blog. But we will actually teach you how to host your WordPress website for free.
If you are starting a new blog or WordPress website that will be updated less often, or you are just testing WordPress, then free hosting with headless WordPress will come in handy for you. You can save a few bucks every month with this method to host your WordPress website for free.
This method will not work for WordPress websites that are updated regularly or have huge traffic monthly.
Headless WordPress
Before we go into the hosting of WordPress websites, let's first learn about headless WordPress and its benefits.
A headless WordPress website is a static website that does not have the dynamic functionalities of the WordPress admin dashboard. This means the website will be created using WordPress CMS and then its static version will be generated and used on the main domain.
So the head of the WordPress which carries all the dynamic operations will be cut down and only its static pages will be used to showcase as the website.
For the website visitors, no difference is seen in a headless WordPress website. But for the website admin, the head of the WordPress is hosted in localhost or another hosting service.
Benefits Of Headless WordPress
For the website visitors, the headless WordPress website will not look any different from a full version WordPress website. But for the WordPress admins, a headless WordPress website comes with many benefits.
Some of these benefits are:
- Security: The best part of a static website or a headless WordPress website is the security. It is not possible to hack or intrude on a static website for hackers. Because there are no dynamic PHP files or SQL queries that are executed in a headless WordPress.
- Fastest Website Speed: A static website will always be the fastest to load when compared to its dynamic website. So very minimum effort is required to correct the Core Web Vitals of headless WordPress websites.
- Less Maintenance: No need to update plugins or themes regularly for headless WordPress websites. As there is no WordPress admin dashboard attached, so there is no need to update WordPress or its themes or plugins.
- Less Bandwidth: Headless WordPress websites do not have a database attached or the admin dashboard. So there are no calls made to the backed of WordPress which results in less bandwidth consumed by every visitor.
Use Cases For Headless WordPress
We saw the benefits of headless WordPress. But it is not applicable for all websites or WordPress users. Let's see the situations where a headless WordPress website will be the best to go with.
- Static Website: If you want to just have a static website and no use of a dynamic website then a headless WordPress website will be helpful. Just create once using WordPress and then generate its static version. We have a nice blog post about generating static WordPress websites here:
- Not Regularly Updated Content: If you do not update the content of your WordPress website regularly then going with headless WordPress reduces its maintenance time and cost.
- Secured WordPress website: If you want your WordPress website to be secured then headless WordPress websites are the best option to go with. There is no possibility of hacking WordPress websites with no dynamic functions.
- Less Traffic: If your website gets less traffic and consumes less than 1GB bandwidth a month then headless WordPress website hosting will be free with our suggested hosting solution in this post.
- Small Website Size: Your website is small in size including its media, then a headless WordPress website will be easy to handle. Fewer images, videos, or audio on your WordPress website will contribute to the small size of the website.
If you meet or require all the conditions above, then you are ready to go for a headless WordPress website. All you need now is to find the perfect hosting for it. Do not worry, we got the best and free hosting for your WordPress website with no head.
Hosting WordPress Website With Netlify
Hosting a static website or a headless WordPress website is possible on any regular hosting server. It can be hosted on a simple shared hosting too.
But since we promised in the heading of this blog post to give you the best free hosting for a headless WordPress website, we have chosen Netlify as the hosting solution.
It is a little difficult to set up with Netlify if you do not know about Git and its commands. We have tried to keep the Git part easiest and smallest in this post.
Once you set up the process with our method described here, it is easy to update your WordPress website on Netlify with just a few commands.
Without any delay, let's get started with the process of setting up free hosting for WordPress websites with no head.
Step 1. Signup For GitLab
Netlify updates itself to attached repositories created on Github, GitLab, or BitBucket for the website files.
Out of the three options presented by Netlify to its users, we found GitLab and BitBucket as the best ones. Here you can create private repositories.
We chose GitLab as it is easier to use and has got the option to upload files from the browser too. But we do not recommend it as it will be difficult to update those files later.
Go to https://gitlab.com/ and signup if you don't have an account with them.
Make sure to keep your email ID and password safe as we will be using them in further steps.
After Signing up, we will create a new project with the repository to store the static files.
Go to the homepage after signing in to GitLab and click the New Project button on the top right.

Select the “Create blank project” option on the next screen.
On the next screen, put a Project Name.
Project description is an optional field. Put visibility as Private.
Deselect the two options under Project Configuration. These are not required for static files.
Click on the Create Project button once all the fields are filled.
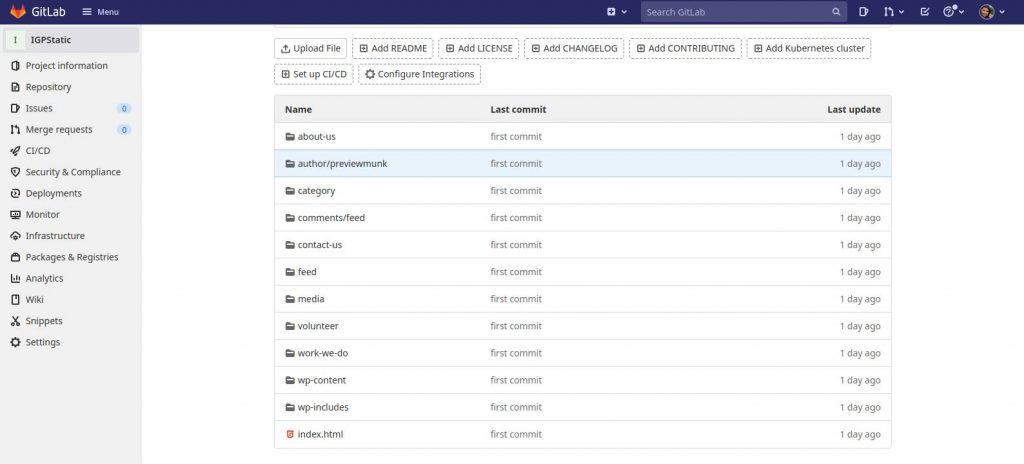
Once the project is created, the project page will look like this.
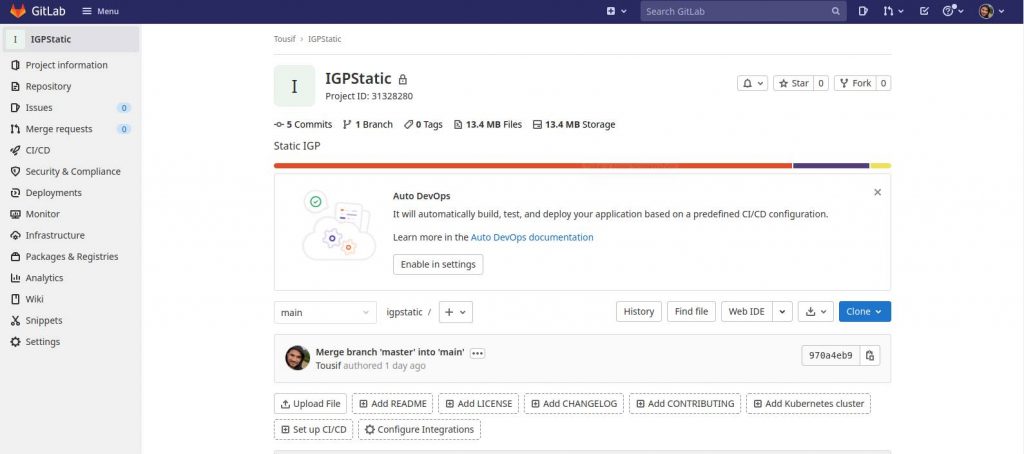
We are done with the GitLab project creation. This is also known as a repository in programming terms.
Copy the link to this repository. Save this URL as we will be using it in further steps.
Step 2: Generate and Download WordPress Static Files
We will be going to the WordPress admin dashboard to generate static files of WordPress. This WordPress website can be hosted on another hosting service or locally on your desktop.
Go to your WordPress admin Dashboard > Plugins > Add New.
Search for the “simply static” plugin in the search box on the top right side.
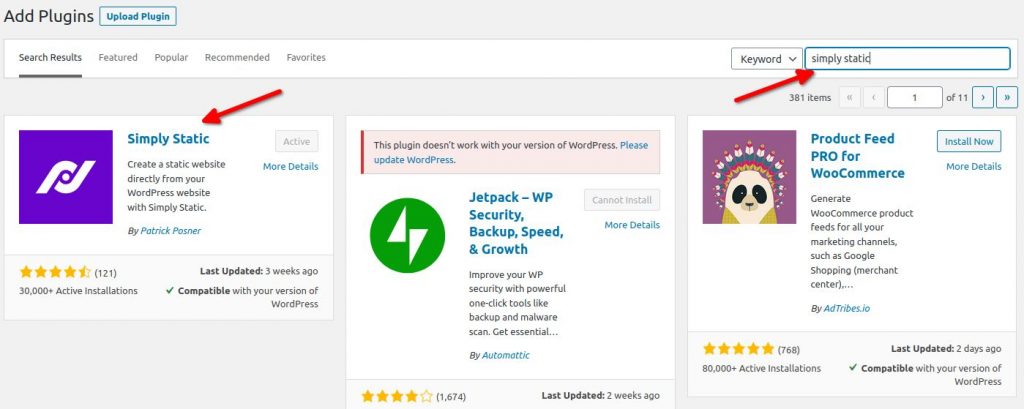
This is a very good plugin to generate static HTML files for any simple WordPress website. We wrote about this plugin in another blog post called How To Convert WordPress Website To A Static Website
Install and activate the Simply Static plugin.
After the activation of the plugin, go to the plugin's page by clicking on the Simply Static link in the WordPress admin.
The good thing about this plugin is that it is not overly complicated. Just by pressing one button, it will start generating static files.
Click on the GENERATE STATIC FILES button.
After a few minutes, you should be able to see the Activity log. It will also have a link to download for the zip file consisting of your WordPress's static files.
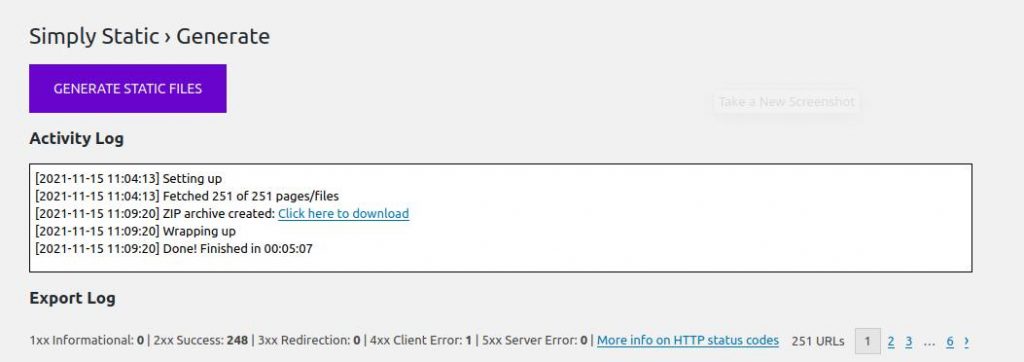
Click on this link and download the zip file to your computer. The file will have a name like “simply-static-X-XXXXXX.zip”. The X being numbers.
Step 3: Setup Git on your computer and push to GitLab Repository
Now that we have the static files all ready to be uploaded on Netlify, we will first upload them to GitLab.
Install Git on Windows following the steps shown in this link: https://phoenixnap.com/kb/how-to-install-git-windows
Extract the zip file we downloaded in the above step. Rename it to your website for convenience.
Go inside the static website's folder. Now open the command prompt here if you are a Windows user. You can do this by simply entering the “cmd” in the address bar.
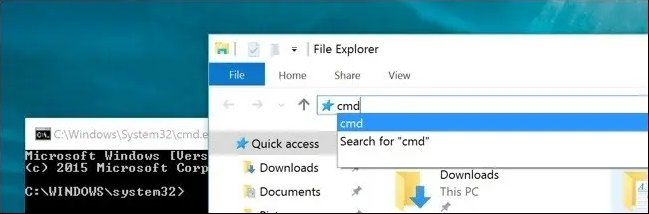
Now insert this command in the command line.
git initWith this command, the git process will start in the folder of your website's static files.
In the next command we will be using the repository URL we saved in Step 1.
Input this command next.
should be replaced with the project URL created in step 1.
Next, we will add new project files to the git we just created with this command.
git add .We need to commit all the files of the folder to the git on your computer with this command.
git commit -m "first commit"And the final step is to upload these files we just committed locally in the above command to our remote repository on GitLab.
We will do this by using this command:
git push -u origin masterOnce you press Enter after the above command it will ask for email and password for GitLab. We also created & saved it in Step 1 above.
Once you push with the above command, all your files will be uploaded to the GitLab project.
Now we are ready for our last step. To upload the WordPress static files to Netlify.
Step 4: Upload WordPress website static files to Netlify
We are going with Netlify to host our static WordPress website files as it has a Free plan that is good for websites with high traffic too. It offers 100GB bandwidth in its Free plan and unlimited websites.
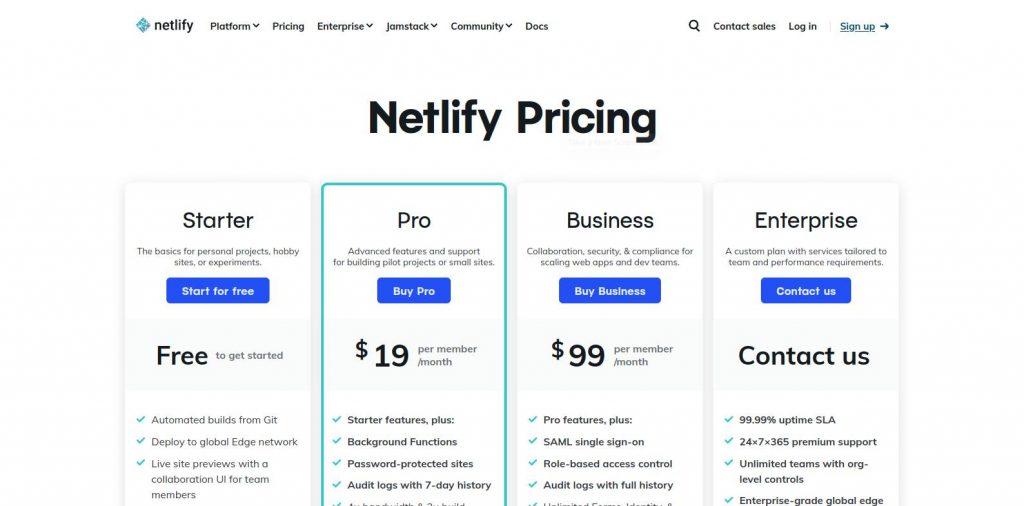
Sign up for the Free plan for Netlify here: https://www.netlify.com/pricing/
Once you confirm the Netlify Email link, you will be redirected to this page.
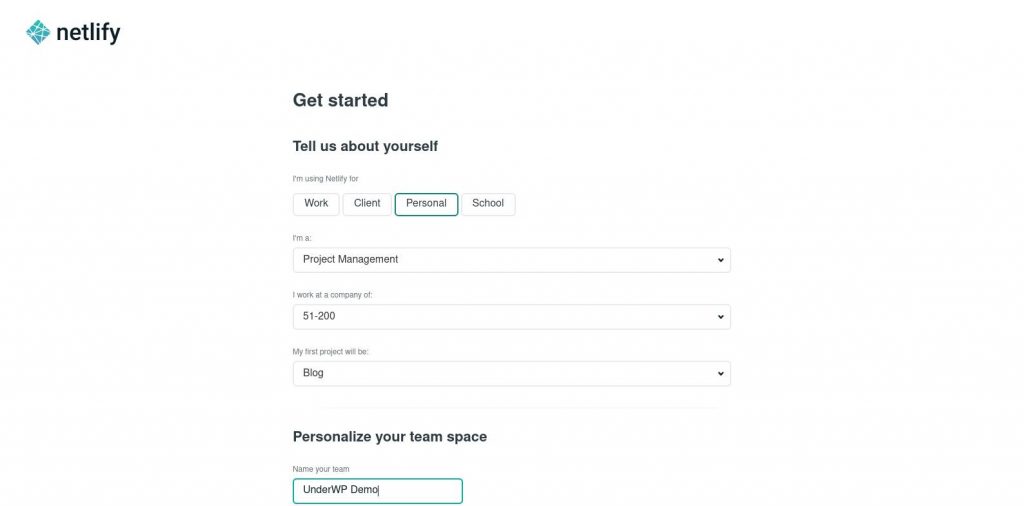
Fill up the required details that suit you. Press the Set up and continue button.
On the next screen, we will be using the Import from Git option.
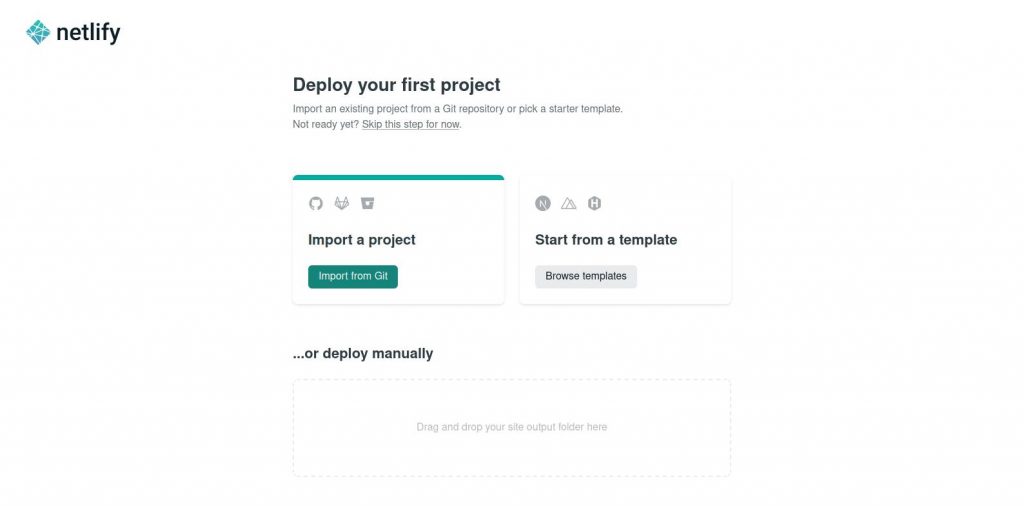
You can see that there is deploy on manually option too. This is also useful if you want to upload the files once and never update them again.
But if you want to update your WordPress website files often, then going the Git way we show here is easier. As it will require only a few commands to update it. We will write about this at the end of this post.
Press the Import from Git option and select the GitLab button.
Put your GitLab account details and grant the required access to Netlify.
Once the GitLab account is connected to Netlify, you will see all your GitLab projects listed on Netlify.
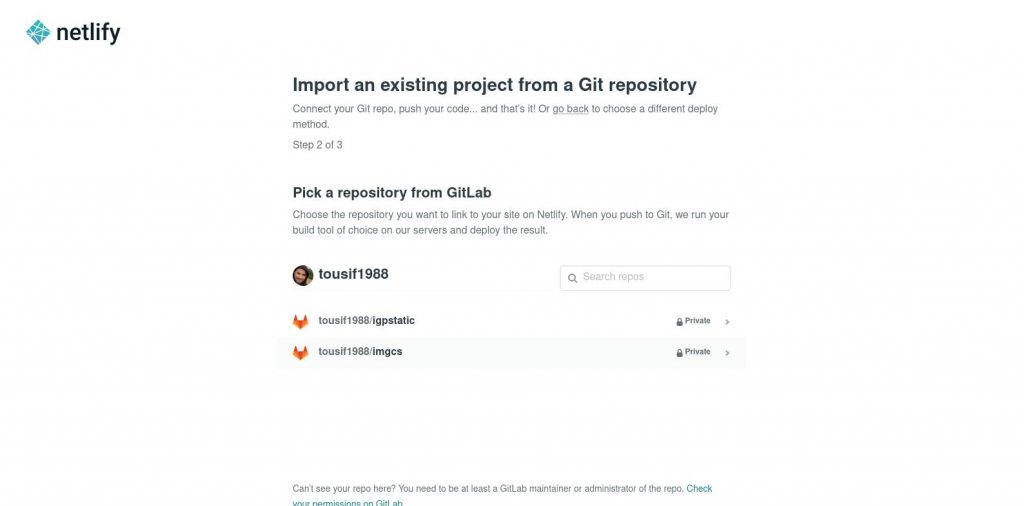
Select the project with your WordPress static files.
In the next step, select the main option which will already be there by default.
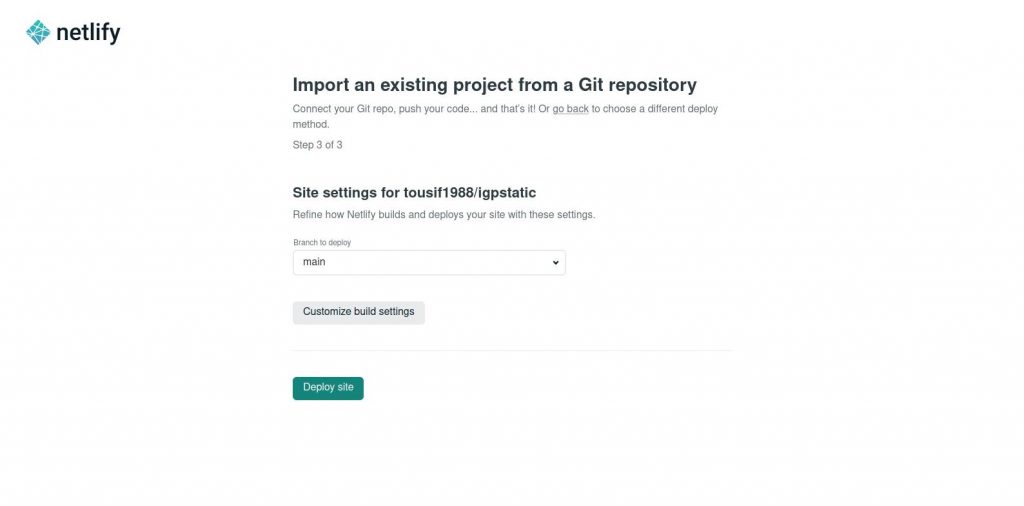
Press the Deploy site button.
Once the website is deployed on Netlify, you will be redirected to the Site overview page with Netlify URL in it.
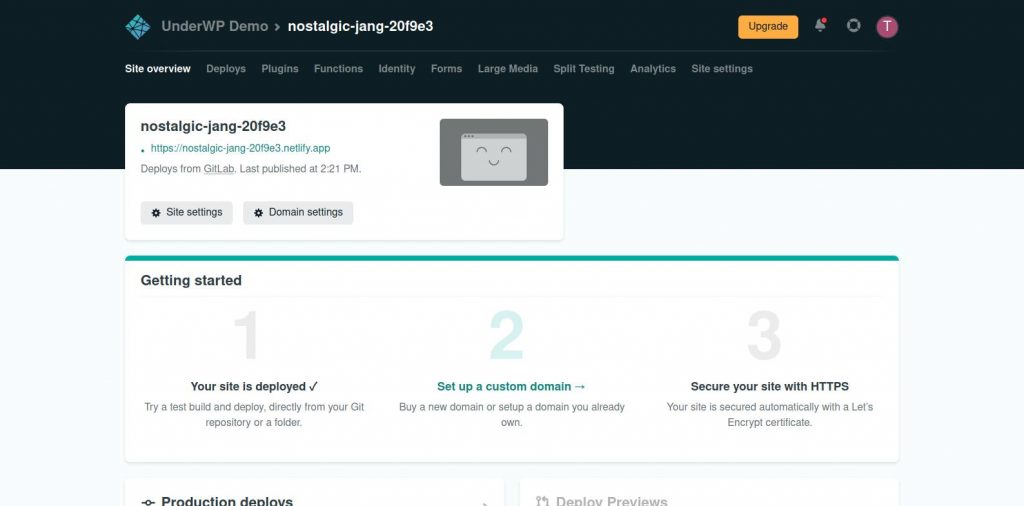
In our example above, the Netlify app link is like this: https://nostalgic-jang-20f9e3.netlify.app
You can click on this and see that static version of the WordPress website.
Now we will proceed with setting up the domain name for the static website we just uploaded.
On the Site overview page, click the “2” link to Set up a custom domain.
On the following page, enter the domain name that you want to set up for this static website and press the Verify button.
If you have not registered this domain name, you can do that on Netlify itself. But if you have already registered it, then press the Add domain button.
To verify the DNS on Netlify, you have to make changes in your domain's DNS records.
Go to Domain management on the Site settings page in Netlify.
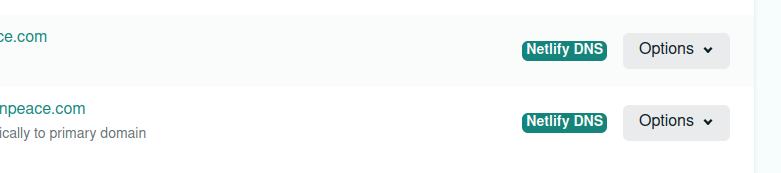
Click on the Options selection box beside your domain name and select the Add Domain option. Follow all the setups procedure and on the end, it will show the DNS that needs to be added to your domain registrar.
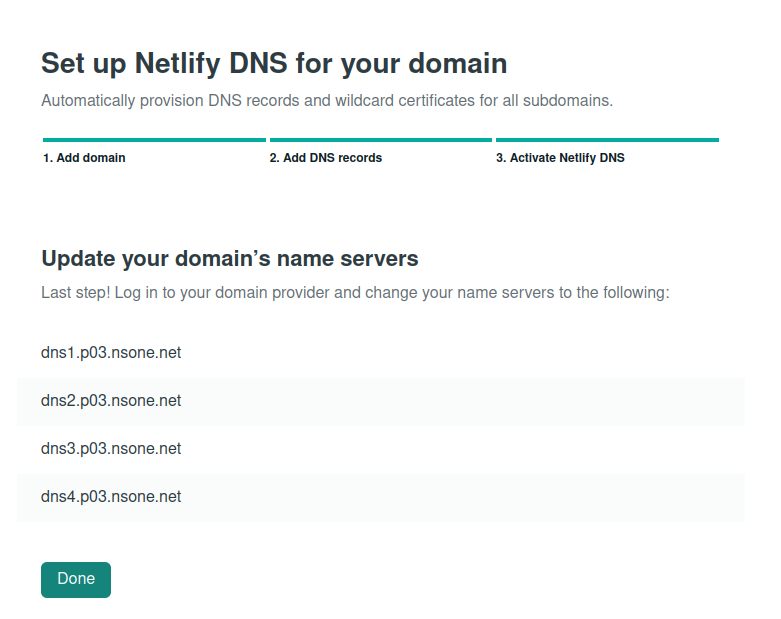
Add these DNS's to your domain registrar. If added successfully then your Domains dashboard under Site settings in Netlify will look like this.
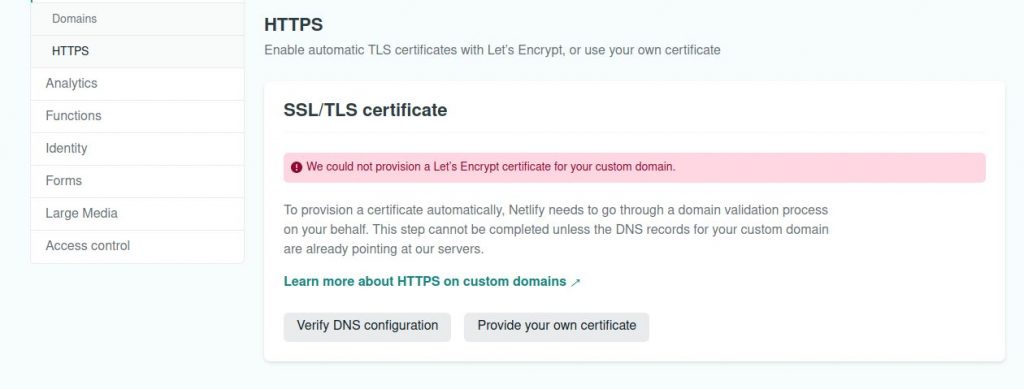
On the same page, go to the HTTPS section and press the Verify DNS Configuration button to verify DNS migration and activate free SSL.
Now that we have successfully added the domain to Netlify. Our setup is almost complete.
You should now be able to see the static version of your WordPress website on your main domain. In some cases, it takes 24 hours until complete DNS migrations happen.
To check if the website has completely moved or not to Nelify, you can go to any WordPress admin URL like this:
yourwebsite.com/wp-admin
This URL should return a Page not found error from Netlify itself.
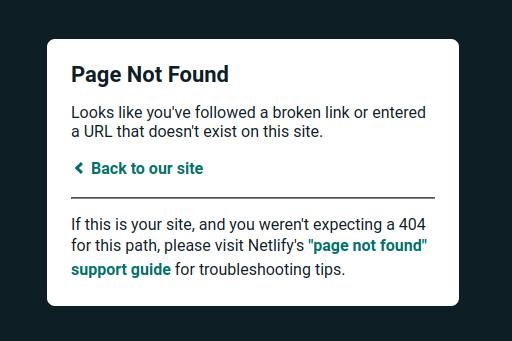
When you see the above page, it means you have successfully migrated your WordPress website with no head to Netlify.
It is time to relax and enjoy the free hosting for your WordPress website from Netlify. The next step is optional and done when you want to update your just uploaded website.
Step 5: Update static headless WordPress website on Netlify
This step is optional.
If you want to update your static WordPress website with new content or design, then using a few git commands on your computer you can do it.
Netlify keeps checking your attached GitLab repository quite often. So all we need to do is update our GitLab repository with new files to be updated on the website.
You can repeat Step 2 of this post to generate static website files from WordPress.
I suggest deleting all the files in your local folder on your computer and downloading the fresh static files generated.
Download and extract the new static files in the same folder on your computer drive. The same folder is to be used because we have set up git here. So with just a few commands, we can update these new files to our already created repository on GitLab.
Now enter this command to add the new files and folders of the updated WordPress website.
git add .Then enter this command to make commits and their related notes.
git commit -m "updated on December"You can put any message in the above command in between the ” “.
The last command that will update the GitLab repository is this:
git push origin masterThis will finally update your Gitlab project with new updated files for your headless WordPress website.
Final Words
The method we described here using Git and Netlify is the easiest we found that can be updated once in a while. And with Netlify's free plan of unlimited websites and 100GB bandwidth, you can host quite a good number of websites and traffic.
Now you can create websites on your local computer using WordPress, export its static version as shown in this post and host it free. Plus you can update it with just a few commands. This is a one-time setup and easily updateable lifetime.
Now no more headache of WordPress database error and plugin updates. This type of headless static WordPress website is also secured. No need to worry about it getting hacked.
Share this post with your friends who are looking to set up new websites and looking for free hosting. Comment below your thoughts to keep us motivated to write more posts like this.

Amazing post. Never knew this was possible with WordPress. Making a headless WordPress website and hosting it on a free server is the gist of this post.
Thank you for the share.
Using Netlify for my other projects. It is a reliable hosting service. With this method I am sure small websites will gain huge server speed.
Did not know HTML static files were possible with WordPress. In the past I used WP2Static plugin but the results were horrible. I will try Simply Static this time and see how it goes.