One of the most efficient ways of arranging posts into a more logical structure in WordPress is to use categories and tags. They also have the added benefit of improving the general user experience on the website by making the posts more accessible to readers. The majority of WordPress users utilize categories and tags for these objectives on a regular basis, but they rarely use them to their full potential. Even though this article focuses solely on categories, the same approach applies to tags as well.
To begin with, category pages automatically aid in the SEO of your website by offering content that corresponds to specific keywords and phrases. They also provide a way to navigate through a certain set of topics that your readers could find interesting. Despite this, there is one component in categories that are frequently overlooked on WordPress sites: the description.
Category descriptions go along with the category title and provide information about the items in the category. You can increase traffic to category pages with vague or uninteresting titles, or those that would otherwise be disregarded by visitors, by showing a description. Despite its utility, this function is neglected because it is not activated by default in WordPress and is dependent on the theme you install.
How To Show A Category Description In WordPress
In this article, we'll look at two different ways to show category descriptions in WordPress. Custom code snippets are required in both approaches.
The first will allow you to show descriptions on category archive pages, which is where most people expect to see them. The second will allow you to display them on any page of your WordPress website.
However, before proceeding, you should build a backup of your website just in case something goes wrong. It's also a good idea to brush up on your FTP skills, as FTP will be required for accurately inputting the code.
Finally, it's worth noting that this post is aimed mostly at intermediate and advanced WordPress users. To put it another way, even though we tried to cover everything in this article, depending on your WordPress knowledge, you may need to conduct some further study. Let's get started now.
How To Add A Category Description To WordPress
Before we look at how to display a category description in WordPress, let's look at how to add one. Go to Posts > Categories first to add a description to a category. There are two parts there: one for creating new categories, and the other for viewing your existing categories.
Fill out the Add New Category box on the left to create a new category. This comprises giving the category a name, providing a slug to it, designating a parent category (if necessary), and writing a description in the Description box. When you're finished, click the Add New Category button to make a new category.
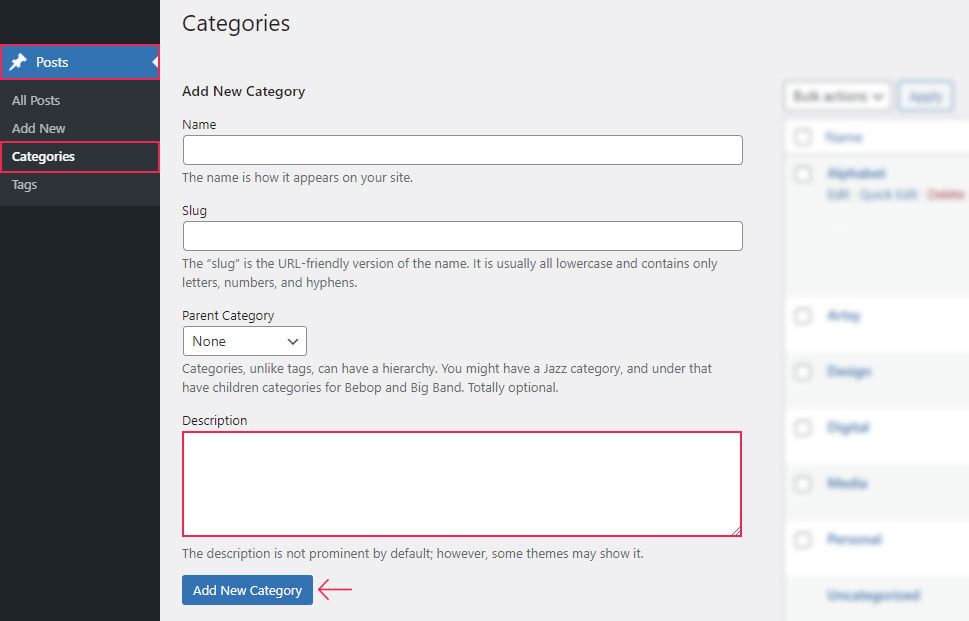
If you wish to add or change the description for an existing category, however, you must first locate it in the list of existing categories on the right. To see the other options, you'll need to hover over it. Finally, select Update to create a new description or edit an existing one.
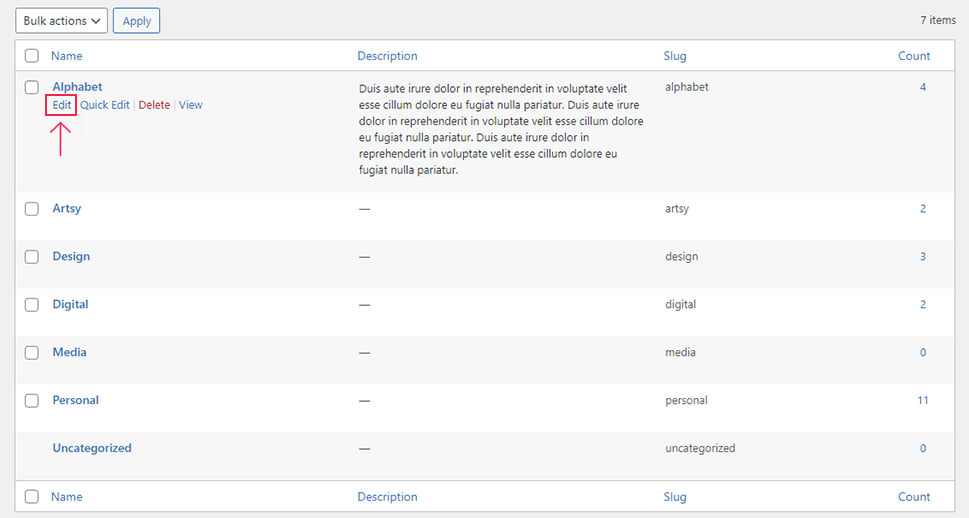
This will take you to the category edit screen, where you may change the description in the Description area. Press the Update button at the bottom to save the information you've entered.
Displaying The Category Description On Category Archive Pages
Although you may anticipate a category archive page to display a category description after you've added it in the previous step, this is not the case. It is not the typical WordPress behavior to display category descriptions, and it is entirely dependent on the theme you are using.
On category archive pages, some themes display the description, while others do not. As a result, regardless of the theme you're using, the first option we'll go through is how to show a category description on a category archive page.
In usually, the archive description() is all that is required to display the category description. The function displays the description for archives (category, tag, phrase, or author) if they've been inserted earlier. Meaning, if other archives have been uploaded, the code can be used to display descriptions for them as well. It also lets you specify the HTML element that will encapsulate the description.
Example:
The archive description would be encased in a div HTML element with the class underwp-category-description in the following code.
the_archive_description( '', '' );You'll need to put it in the right theme template file for it to display the archive description. Depending on your theme's file structure, that file could be the category.php or archive.php file, or another template file.
However, because modifying your theme's template files directly isn't good coding practice, we'll show you how to achieve the same outcome with hooks.
Apart from the risk of disrupting your website, altering the template files of your theme will result in any changes being lost when you update the theme. Rather, the custom code you write should be “hooked” onto a suitable hook.
Consider hooks as little code placeholders that developers leave inside files to assist you to understand this notion. You may achieve the same functionality by “hooking” your code onto them as if it were explicitly inserted inside the template file in the same spot as the placeholder hook. The advantage of doing so is that you can FTP the entire hooked code into your child theme's functions.php file or a site-specific plugin, making it secure from theme updates.
Hooks are divided into two types: action hooks, which are used to add new features, and filter hooks, which are used to change current features. We'll need to use an action hook because our goal is to show the category description, which hasn't been shown before. With that in mind, we built the code you see below as an example.
if ( ! function_exists( 'your_function_name' ) ) {
function your_function_name() {
if ( is_category() ) {
the_archive_description( '', '' );
}
}
add_action( 'your_hook_name', 'your_function_name' );
}
Let's dissect this code.
It depicts a function called your function name() that is called from the hook your hook name using the add action() function. If there isn't another function with the same name, the function is called. The major section of the code uses the archive description() method to display the archive description.
We enclosed the code in an is category() conditional statement since we only want to show the description on category pages. The description will only appear on the category archive page, in other words. To utilize this code effectively, you must replace your function name and your hook name sections with the appropriate values.
While coming up with a name for the function isn't difficult (you can call it whatever you want), choosing the right hook to utilize can be difficult. You'll need to either look through your theme's files for the best hook or speak with the authors of your theme about it.
The function name for this article is display description on category archive pages, and the action hook is elementor_action_before_page_content_holder action before page content holder. The code that we used, in the end, is provided below.
if ( ! function_exists( 'display_description_on_category_archive_pages' ) ) {
function display_description_on_category_archive_pages() {
if ( is_category() ) {
the_archive_description( '', '' );
}
}
add_action( 'elementor_action_before_page_content_holder', 'display_description_on_category_archive_pages' );
}
This code, however, cannot be copied and pasted to other themes because it contains a hook particular to the Elementor theme. You must replace the example function name with your own and a hook specific to the theme you're using. After you've finished writing the code, place it in your child theme's functions.php file or a site-specific plugin.
The category description will appear on the category archive pages once you've entered the code into the relevant location. This description frequently necessitates additional CSS code to style it to match the theme.
CSS code like that, on the other hand, is created on a case-by-case basis. As a result, you'll need to write your own CSS code that fits your theme's design and the rest of your website. You can use a CSS selector to help you style the description.
The underwp-category-description class, which was included in the wrapper div HTML element, is the one we added to the code so we can utilize it for stylization now.
For example, we used the following CSS code:
.underwp-category-description {margin: 40px 0;}And this will create an archive page from the Elementor theme.
Making Category Description Visible Across Your Entire WordPress Site
While the ability to display the category description at any time is a significant improvement, some WordPress users may be limited if it is only visible on category archive pages. This option is for those of you who want the description to appear across your entire website, including pages and articles.
By writing the following code, we were able to enable this feature:
if ( ! function_exists( 'underwp_categories_with_descriptions_list' ) ) { function qodef_categories_with_descriptions_list( $atts ) { $default_atts = array( "cat_ids" => '' ); $params = shortcode_atts( $default_atts, $atts ); $categories = array(); if ( ! empty( $params['cat_ids'] ) ) { $categories = explode( ',', $params['cat_ids'] ); } $output = ""; if ( ! empty( $categories ) ) { foreach ( $categories as $category_id ) { if ( ! is_wp_error( get_the_category_by_ID( $category_id ) ) ) { $output .= "" . get_the_category_by_ID( $category_id ) . "
"; $output .= category_description( $category_id ) . ""; } else { $output .= "" . esc_html__( 'Not a valid ID.', 'textdomain' ) . ""; } } } else { $output .= "" . esc_html__( 'No category IDs were inserted.', 'textdomain' ) . ""; } $output .= ""; return $output; } add_shortcode( 'categories_with_descriptions', 'underwp_categories_with_descriptions_list' ); }Let's take a closer look at this code.
It stands for categories with descriptions, a custom shortcode. The underwp categories with descriptions list() function were used to build it, and the add shortcode() function was used to register it as a shortcode.
We'll give you a general summary of what the desired effects of this shortcode are and how it should be utilized rather than going into depth about each section of the code.
Only one parameter, cat ids, is accepted by this custom shortcode, and the default value is an empty string. The cat ids option is a list of category IDs that should be inserted, separated by a comma (,). Three alternative outcomes are possible depending on the parameters you enter.
If no category IDs were entered, a notice indicating “No category IDs were entered.” appears. Otherwise, a notice indicating Not a valid ID. is displayed for every invalid entry, whether it is an invalid ID or something that isn't an ID at all.
Finally, the name and description of each valid category ID are displayed, with the category name connecting to the category archive page.
Let's look at how to use this shortcode now that you know what it's supposed to do. As previously stated, it only accepts a list of category IDs as an argument. As a result, you'll need to know how to determine the ID of a specific post category in order to use it.
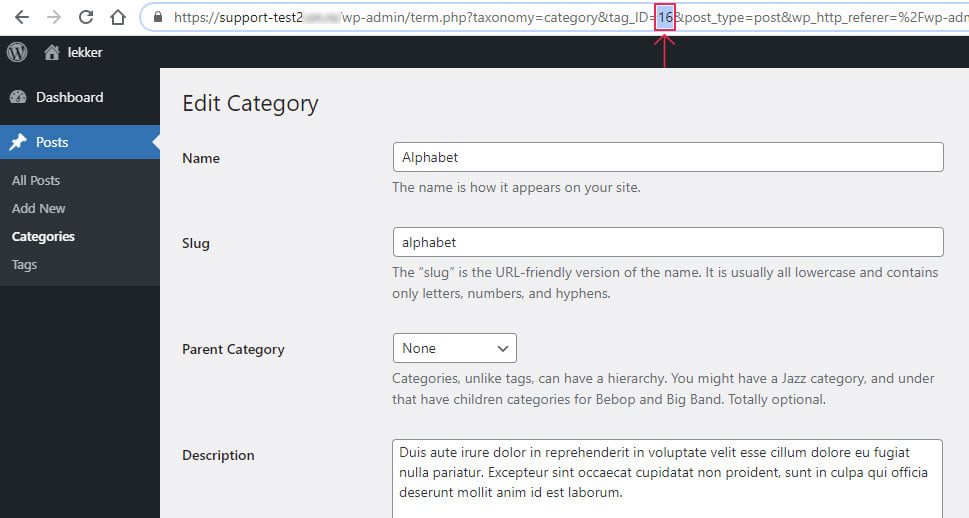
To do so, go to Post > Categories and click the Edit button next to one of your categories to see its ID.

This will bring up the edit screen for the categories. By looking at the page's URL, you'll be able to determine the category's ID. The ID is the number following the category&tag ID= section of the URL. The category ID in the example below is 16.
You can then go back to the Dashboard without changing anything on the previous panel.
We can look at how a shortcode is utilized once you've determined the IDs of all the categories you want to display with this shortcode.
To utilize a custom shortcode, you must call it from within another shortcode that adds text. These shortcodes for adding text may have different names depending on whatever page builder plugin you're using. It's the Text Editor in Elementor. It's the Text Block for WP Bakery. It's a specific Shortcode block for Gutenberg.
For this post, we are going to use the Gutenberg editor. Open up your post to edit. Search for the shortcode block by clicking on the “+” button in the editor.
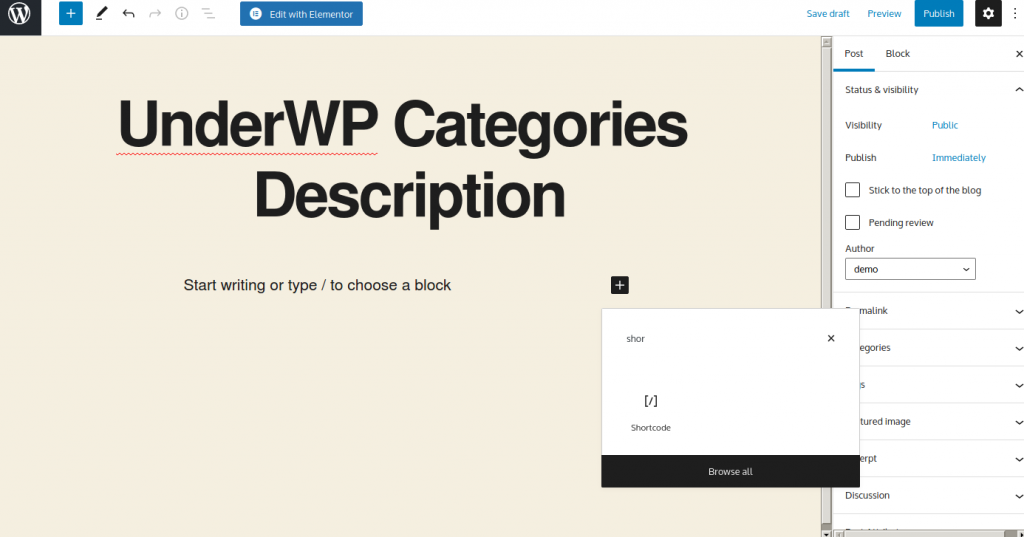
However, because our shortcode allows a parameter, we must include it in addition to the value(s) we wish to utilize as the parameter value (s).
As previously indicated, our shortcode accepts only one parameter, cat ids, which should be a list of category IDs separated only by commas (,).
This list of category IDs should be enclosed in quotes, and no comma is required if only one category ID is included.
Example:
shortcode with single category ID
[categories_with_descriptions cat_ids = “11”]shortcode with multiple category ID's
[categories_with_descriptions cat_ids = “35,56,87”]Example a) demonstrates how to insert a shortcode call for a single category with an ID of 11. Example b) on the other hand, demonstrates how to insert a shortcode call for various categories with IDs of 35, 56, and 87 in this case.
Keep in mind that these example IDs must be replaced with appropriate category IDs from your website. You can also add as many category IDs as you like, as long as they follow the pattern outlined in the samples.
To save your input, press the Update/publish button after inserting the relevant shortcode call into the Shortcode widget.
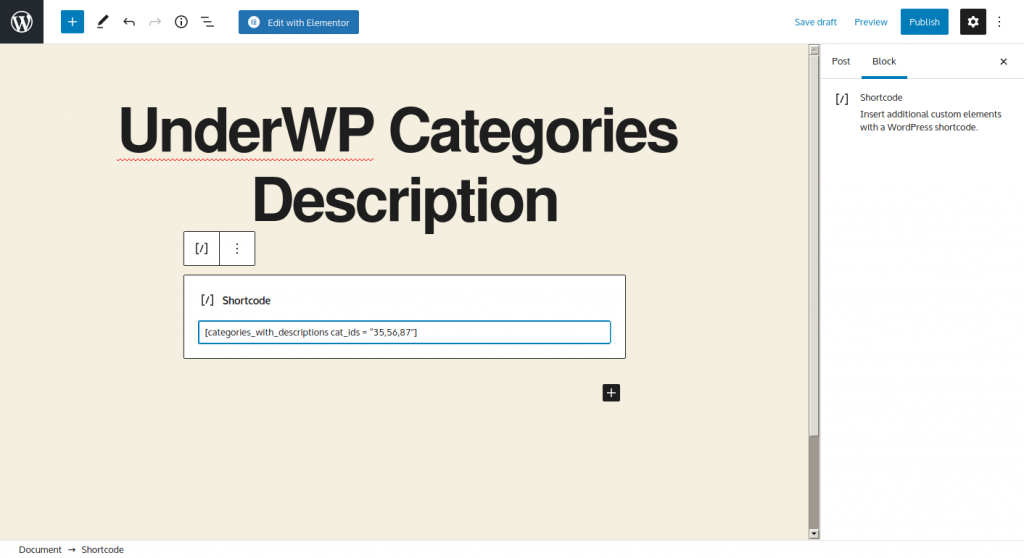
Now open the link to the post we just saved. It will display the category names and descriptions.
We haven't formatted its design so it might look a bit off. You might have to work on its CSS to set its design right.
To edit its CSS, go to Appearance > Customize > Additional CSS. Here you can insert the CSS code of your choice and test whichever design suits your theme.
For this example, let's go with this CSS code:
.category-list .list-item {
padding-bottom: 50px;
border-bottom: 2px dotted black;
}
.category-list .list-item h3 {
font-size: 14px;
}
This CSS code will get you started stylizing your category information display. To make it more WordPress friendly, you can use this code by placing in a separate CSS file and uploading it by FTP to your WordPress installation.
If you plan to do that, then you have to study more about WordPress's wp_enqueue_style() function. This function enqueues styles and scripts to WordPress.
Show Category Description Using Elementor Plugin
As you see above, this task in WordPress is time-consuming. It requires your complete attention because if you miss any line or even a comma, you might end up with a lot of errors.
To fix or hide WordPress errors or warnings, check out our other post about it here: Best Plugins For WordPress To Hide Warnings And Notices
If there was a plugin that can do all of this, wouldn't that be helpful? Yes!
Unfortunately, there are no free plugins as of now that can do these for WordPress posts. There are plugins for woo-commerce but for showing category descriptions, there are no free plugins in the WordPress repository.
Elementor Pro which is a paid plugin helps you display category descriptions in WordPress with ease. You do not have to make your hands dirty with coding by use of this plugin.
Open up the Elementor editor panel for the post. Drag and drop the Text Editor widget below the category title.
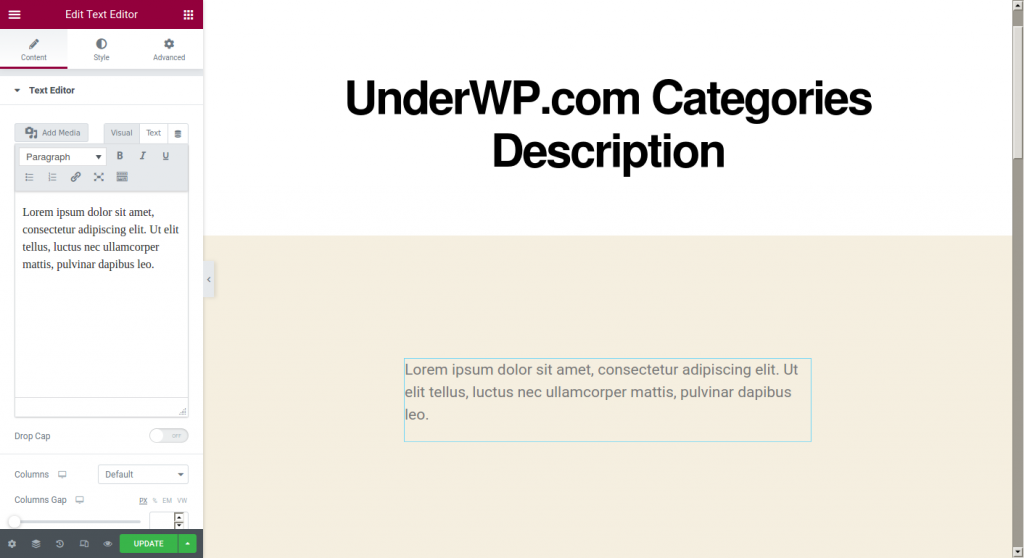
Click on the dynamic link of the widget. Select the Archive Description for the dropdown.
Now save the changes with the Update button. Voila! You have now an archive description showing up on the page.
Final Words
WordPress category descriptions provide more information about a category and encourage users to view posts that they might otherwise overlook if they only had the category title to rely on. WordPress, on the other hand, does not offer a built-in option for displaying category descriptions. Instead, you'll have to display them with some coding skills.
We explored three distinct approaches to display category descriptions in this article, as well as some code examples. It's entirely up to you whether you want the descriptions to appear only on category archive pages or on any page.
We also covered crucial intermediate and advanced WordPress subjects including how to create custom shortcodes and how to use them, as well as how to use WordPress hooks. And finally, we also showed you the easiest way of all by using the Elementor Pro plugin.
We hope this post was helpful in both adding a WordPress category description and boosting your WordPress knowledge. Let us know in the comments below.


