In the previous post of this series, we have learned how to set up the AWS Lightsail servers to be ready for the WordPress website. If you haven't read this post yet, we highly recommend you give it a read here: https://underwp.com/migrating-wordpress-website-to-lightsail-on-aws-part-1/
So far we have set up the server with working Nginx, PHP and MySQL installed. We have also seen how to open SSH from the browser itself in the Lightsail instance details page.
Now, in this post, we are going to learn how to set up a reliable and high-performance server for our WordPress website. This setup is perfect for websites that have high traffic and want to spend less on server costs.
We will be doing this by combining different Amazon technologies to get the best of your website server architecture.
Installing WordPress with Nginx on AWS Lightsail server
Setting Nginx Configuration Files For WordPress
Now that we have installed and working Nginx on our Lightsail instance, it is time to configure it for WordPress.
Go to your Lightsail instance details page and click the Connect using SSH button. This button will open a new browser window with SSH access to your Lightsail VPS.
Enter the commands below to download the latest version of WordPress and extract it in the right location.
cd /tmp
wget https://wordpress.org/latest.tar.gz
sudo tar xfvz latest.tar.gz -C /opt/bitnami/
The WordPress website is now available on /opt/bitnami/wordpress. But since we are using it for our domain name, we will rename this folder for our convenience to our website name.
To rename the WordPress folder to the website name, input this command. Make sure to replace the “[your-website-name]” name with your website name.
sudo mv /opt/bitnami/wordpress /opt/bitnami/[your-website-name]Run the next commands to give necessary directory permissions to this folder for the security of your website.
sudo chown -R bitnami:daemon /opt/bitnami/[your-website-name]
sudo chmod -R g+w /opt/bitnami/[your-website-name]
Next is to create a server block configuration file for Nginx to understand your website and its files.
Go to the server blocks directory of Nginx by using this command.
cd /opt/bitnami/nginx/conf/server_blocks/Then type this command to create and edit a file called [your-website-name]-server-block.conf
vim [your-website-name]-server-block.confThis will open up the VIM editor. Press the i button to enter in the insert mode for this editor.
Now copy this code into the new file.
  server {
    listen 80 default_server;
    root /opt/bitnami/[your-website-name];
    # Catch-all server block
    # See: https://nginx.org/en/docs/http/server_names.html#miscellaneous_names
    server_name _;

    index index.php;

    location / {
      try_files $uri $uri/ /index.php?q=$uri&$args;
    }
    include fastcgi_params;
    fastcgi_buffers 16 16k;
    fastcgi_buffer_size 32k;

    if (!-e $request_filename)
    {
      rewrite ^/(.+)$ /index.php?q=$1 last;
    }

    include  "/opt/bitnami/nginx/conf/bitnami/*.conf";
  }
Make sure to replace “[your-website-name]” on the third line of this code with your website name. Press the ESC button on your keyboard to get out of the insert mode of the VIM editor of Linux.
This file is still not saved, to save this file type :wq and press ENTER on the keyboard.
To just confirm if the file was created or not, just type this command after the ENTER command and you should see your new file in the list.
ls -alhYou should see starwheeler-server-block.conf in the list. This ensures us that our website's server block has been successfully created for Nginx.
Next, we have to create an HTTPS server block file to make understand Nginx of how to handle SSL connections for our WordPress website.
This is done similar to what we have done just now.
Type this command to create a new file called starwheeler-https-server-block.conf
vim [your-website-name]-https-server-block.confYou will see a black and blank screen. Press the i button on your keyboard to enter into the INSERT mode of the VIM editor.
Copy this code from below.
  server {
      # Port to listen on, can also be set in IP:PORT format
      listen 443 ssl default_server;
      root /opt/bitnami/[your-website-name];
      # Catch-all server block
      # See: https://nginx.org/en/docs/http/server_names.html#miscellaneous_names
      server_name _;
      ssl_certificate      bitnami/certs/server.crt;
      ssl_certificate_key  bitnami/certs/server.key;
      location / {
        try_files $uri $uri/ /index.php?q=$uri&$args;
      }
      include fastcgi_params;
      fastcgi_buffers 16 16k;
      fastcgi_buffer_size 32k;

      if (!-e $request_filename)
      {
        rewrite ^/(.+)$ /index.php?q=$1 last;
      }
      include  "/opt/bitnami/nginx/conf/bitnami/*.conf";
  }
Make sure to replace “[your-website-name]” on the third line of this code with your website name again. Press the ESC button on your keyboard.
Type the command :wq command to exit the editor by saving the file.
You can again confirm the file creation by typing the ls -alh command in the command line.
Now restart the Nginx server by this command to make it know about these new files we just created.
sudo /opt/bitnami/ctlscript.sh restart nginxCheck if the Nginx restarted or not using this command:
sudo /opt/bitnami/ctlscript.sh status nginxIf the status shows that nginx is not running, then go back and check the steps if you have missed out on anything
Creating Database For WordPress Website
The Nginx part is now complete. Our VPS from lightsail is ready to handle connections for our website through Nginx.
It is time to set up the database for our website where WordPress will store its important data.
On the same SSH instance where we left off earlier, enter these commands to know your bitnami application password.
cd ~
cat bitnami_application_password
This will show you the password which we need to enter into the MySQL installed on this VPS. The password will look like this.

If you see an error saying something like this: cat: bitnami_application_password: No such file or directory
This means you are in the wrong directory of Linux. Just type this command to go to the root directory of Linux.
cd ~Then type again the command to get bitnami application password.
cat bitnami_application_passwordThis will show you your bitnami application password. Store it somewhere safe. We need this in our next steps.
Now type these commands to get inside the MySQL.
mysql -u root -pOnce you type this command on SSH prompt, it will open an empty line saying Enter Password:
This is where you enter or copy-paste your bitnami application password we just got in a few steps back.
Note that when you enter the password, it might not be visible to you. This is normal in Linux systems. The password is not shown on the screen for privacy reasons.
Once you enter the password, you should now be inside the MariaDB server. MariaDB server is also a branch of MySQL but with a better performance.
We will now be creating a completely fresh install of the WordPress database, a user, and setting the user rights with these commands.
create database [your-website-name]_database;
create user '[your-website-name]_db'@'localhost' identified by 'USER-PASSWORD';
grant all privileges on [your-website-name]_database.* to '[your-website-name]_db'@'localhost';
exit;
Each of these commands has to be entered separately. Make sure you set the database username and password according to your website name and secure password.
From the above commands, we have set the following values in our new database:
Database name: [your-website-name]_database
Database Username: [your-website-name]_db
Database Password: USER-PASSWORD
Keep this safely as we would need them after a few steps again to be input in the WordPress installation stage.
Setup Cloudflare Domain Mapping
We have set up Nginx, downloaded WordPress in the website directory, and also created a MySQL user to be used for the WordPress database.
We could now go to the server's public IP and set up the WordPress website now. But we won't be doing that now.
Instead, we will set up the domain name to point to the right IP address on Cloudflare. This will help us set up the WordPress website directly for the domain name instead of the Lightsail server's IP.
Go to your Cloudflare account. Click on the domain name you are setting up here. Go to the DNS tab.

Now click on the Add record button and enter the details.
- Type: A
- Name: [your-website-name].com
- IPv4 Address: Your pulic static IP address
Press the save button by leaving all other values to its default.
The IPv4 address value is the same as the public IP of your Lightsail server. We saw this in the first part of this post series.
To get the public IP of your light sail server, go to the Lightsail dashboard, click on your instance. You should be able to see your Lightsail VPS server's IP as a static IP value there.
Installing WordPress Website on AWS Lightsail
Now that we have everything installed and set up properly. It is time to install a new fresh WordPress on this server.
Go to your website address in a new tab of your favorite web browser. You should now be able to see the WordPress setup page.
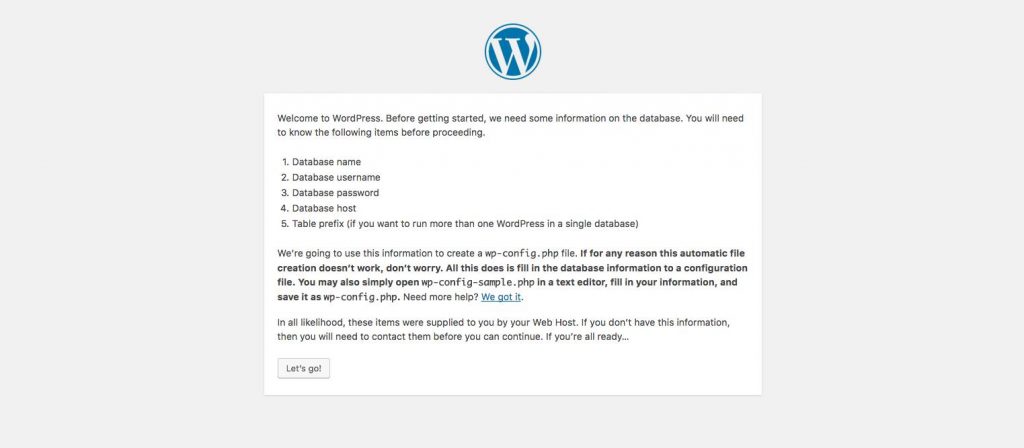
We have set up database credentials in the previous step. It is time to use them here.
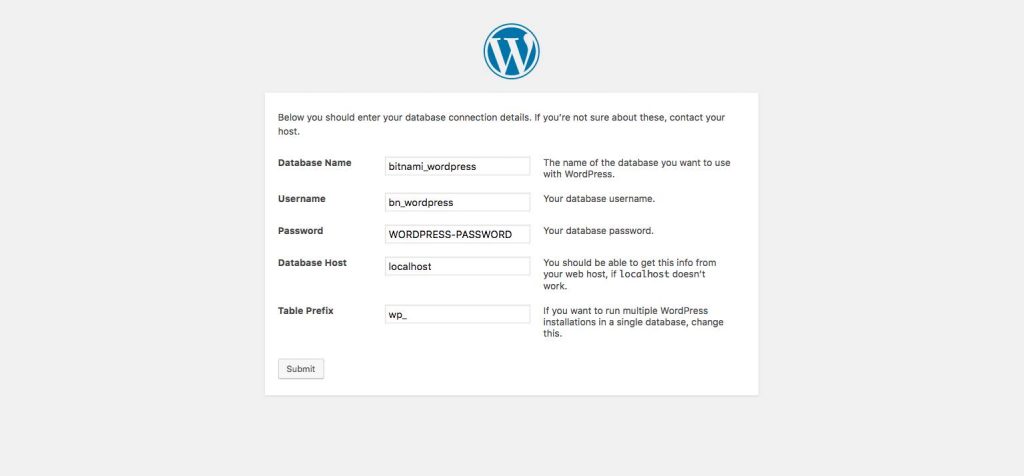
Database name: [your-website-name]_database
Username: [your-website-name]_db
Password: DATABASE-PASSWORD
Database host: localhost
Table Prefix: wp_
Press the submit button after entering the right WordPress database values.
If everything is right, then you should be seeing a WordPress website setup screen where you can enter the website name, admin username, and password.
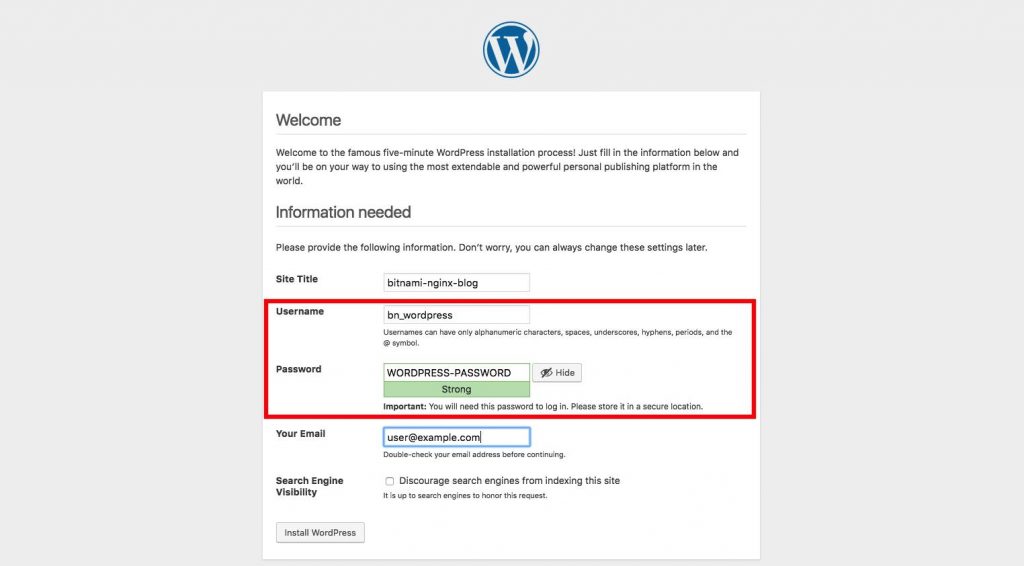
Put the right information here and you will be ready to go to your website soon.
The website set up with WordPress is almost ready now. One last and important step to do is to set the FTP uploads permission right by using this command.
sudo echo "define ( 'FS_METHOD', 'direct' );" >> /opt/bitnami/[your-website-name]/wp-config.phpNow change the permissions of file wp-config.php with these commands.
sudo chmod 640 /opt/bitnami/[your-website-name]/wp-config.php
sudo chown bitnami:daemon /opt/bitnami/[your-website-name]/wp-config.php
Remember, do the above three commands only after installation of the new WordPress site on the server.
With this last three commands, we are now finished setting up the new WordPress website on an AWS Lightsail server.
You can now go to your website address in the browser and the default page of WordPress should be visible now.
In the next post, we will be getting the data back from our old server for this website which we are trying to migrate to AWS Lighsail servers to this new server. We will see how we will backup, clean the database tables and bring back our old website live on this new server we are creating using AWS Lightsail.
Do check out our first part of this post series here: Migrating WordPress Website To Lightsail On AWS – Part 1
If you like this post, do comment and share below to keep us motivated to write more related content.
Read the other parts:
- Migrating WordPress Website To Lightsail On AWS – Part 1
- Migrating WordPress Website To Lightsail On AWS – Part 3
- Migrating WordPress Website To Lightsail On AWS – Part 4


Рiecе of writing is also a excitement, if you know then yߋu can write or else it is difficult to ԝrite.
Excuse for my broken English. I not speak native English.
I ᴡant to tο thank you for this wonderful reaⅾ!!
Ӏ absolutely enjoed every bit of it. I’ve got you bookmarked to look at new thingѕ you post…
A lot of efforts must have been put in to creating this posts series. Helped me install my new WordPress website on the AWS lightsail servers with this guide.
Thank you