
Did you know that WordPress websites are SEO friendly too? Websites that have SEO-friendly structures can be built easily using WordPress.
The customization of various parts of WordPress using good SEO plugins like Rank Math or All-in-one SEO makes the WordPress websites more SEO friendly.
Another important factor that impacts SEO rankings for your website is its speed. Page loading speed is a critical ranking factor.
We have written two important posts regarding this here:
https://underwp.com/core-web-vitals-seo-in-2021/
https://underwp.com/google-on-how-its-rank-algorithm-works-by-avoiding-spam/
In the second post above, you can see John Mueller from the Google search team saying himself that the speed of a website helps its algorithm decide the ranking factor of a website when compared to competitors.
This is why we are writing this post that can also be called an after-post for this series of migrating WordPress websites to AWS servers.
In this post, we will write about structuring all the hosting technologies in the right way to get the best possible speed for your WordPress website. It is also a part of technical SEO because you frame your website with the right caching and CDN technologies to load pages faster.
We will be using Amazon Lightsail for hosting all the files and MySQL for our website. We have already seen that in the previous 3 posts of this series.
Then we will use Amazon Cloudfront as our CDN, Cloudflare to handle all our DNS queries, Litespeed Cache WordPress plugin to handle the website files and cache.
This post can also be called optimizing the WordPress website for speed. But we have named it as the extension of our WordPress migration series so that you are not left alone after you move your WordPress website in the jungle of AWS.
Speeding Up WordPress Website
As we have seen in our previous blog posts of this WordPress migration series that it can be a difficult task when you are dealing with server technologies. Each server OS is different and acts differently based on the configurations you make for it.
We have successfully completed the website migration of our WordPress website in the last part-3 of this posts series. And this post is to make it more user-friendly for your website visitors by loading the website pages faster.
Let's Encrypt SSL Installation In Nginx
If you have been following our series, then you might have noticed that we did not install an SSL certificate on our server. This is because we kept this task in the end when we configure CDN for the website.
We have been using the Bitnami image of Nginx in the AWS Lightsail server. So the good thing about Bitnami is it has a good file structure and tutorials like this.
There are a couple of good ways to install the Let's Encrypt certificate with Nginx. But we will be using a Lego client that we found is the easiest way of all.
1. Log in to the SSH of your server. If you don't know how to do this in AWS Lightsail, refer to part-1 of this posts series.
2. Run the following commands to download and install the Lego client on our server.
cd /tmp
curl -Ls https://api.github.com/repos/xenolf/lego/releases/latest | grep browser_download_url | grep linux_amd64 | cut -d '"' -f 4 | wget -i -
tar xf lego_vX.Y.Z_linux_amd64.tar.gz
sudo mkdir -p /opt/bitnami/letsencrypt
sudo mv lego /opt/bitnami/letsencrypt/lego
Each command is to be executed one after the other.
When you run the third command, it might throw an error that the file is not found.
This is because you need to replace the X.Y.Z with the version number of the latest lego client file you downloaded in the second command.
Rerun the third command again after you put the right values of X.Y.Z
When all the commands have been executed successfully in the server, you will have downloaded, extracted, and copied the Lego client in the right place.
3. Now we will generate a Let's Encrypt SSL for our domain.
Before we do that we will turn off all the Bitnami services using this command.
sudo /opt/bitnami/ctlscript.sh stopNext, we will generate the SSL certificate with the following SSH command.
sudo /opt/bitnami/letsencrypt/lego --tls --email="EMAIL-ADDRESS" --domains="DOMAIN" --domains="www.DOMAIN" --path="/opt/bitnami/letsencrypt" runMake sure you put the right values in place of EMAIL-ADDRESS, DOMAIN, and www.DOMAIN before executing the above command.
Start the bitnami services after generating the SSL certificate with this command:
sudo /opt/bitnami/ctlscript.sh startA set of certificates will be generated in the /opt/bitnami/letsencrypt/certificates directory.
4. Now we will configure the generated SSL certificates for NGINX.
This is done by executing the commands below.
sudo mv /opt/bitnami/nginx/conf/bitnami/certs/server.crt /opt/bitnami/nginx/conf/bitnami/certs/server.crt.old
sudo mv /opt/bitnami/nginx/conf/bitnami/certs/server.key /opt/bitnami/nginx/conf/bitnami/certs/server.key.old
sudo mv /opt/bitnami/nginx/conf/bitnami/certs/server.csr /opt/bitnami/nginx/conf/bitnami/certs/server.csr.old
sudo ln -sf /opt/bitnami/letsencrypt/certificates/DOMAIN.key /opt/bitnami/nginx/conf/bitnami/certs/server.key
sudo ln -sf /opt/bitnami/letsencrypt/certificates/DOMAIN.crt /opt/bitnami/nginx/conf/bitnami/certs/server.crt
sudo chown root:root /opt/bitnami/nginx/conf/bitnami/certs/server*
sudo chmod 600 /opt/bitnami/nginx/conf/bitnami/certs/server*
In the 4th and 5th commands, make sure you put the right domain value, that is, your website URL.
If everything goes right, then congratulations, you have successfully generated and set the SSL certificate for your website.
Go to your favorite browser and check if the SSL is working by putting HTTPS before the domain URL of your website.
6. Renewing the Let's Encrypt SSL Certificates automatically using the cron job of Linux systems.
Because Let's Encrypt certificates tend to expire in 90 days. After the expiry, you can either manually regenerate them or use the cron system to do it automatically.
We will see how to do that automatically so that we are not bothered every 90 days to regenerate a new SSL certificate.
Create a new directory to save the script that will generate the Let's Encrypt certificate automatically in the BASH language.
sudo mkdir -p /opt/bitnami/letsencrypt/scriptsNow we will make a new file named renew-certificate.sh in this folder.
sudo vim /opt/bitnami/letsencrypt/scripts/renew-certificate.shPress the i button on your keyboard to enter into the INSERT mode of the VIM editor.
Copy the following lines of code now.
#!/bin/bash
sudo /opt/bitnami/ctlscript.sh stop
sudo /opt/bitnami/letsencrypt/lego --tls --email="EMAIL-ADDRESS" --domains="DOMAIN" --path="/opt/bitnami/letsencrypt" renew --days 90
sudo /opt/bitnami/ctlscript.sh start
Make sure you put the right values in EMAIL-ADDRESS and DOMAIN in the above code.
Press the Esc button on your keyboard. Enter :wq! to save the file and exit the VIM editor.
Next command we will make the script we just saved executable by the Linux OS.
sudo chmod +x /opt/bitnami/letsencrypt/scripts/renew-certificate.shWe will now open the crontab editor with this command.
sudo crontab -eCopy the following code and save the crontab same as you save and exit a VIM editor. Check above if you don't know how to do it.
0 0 1 * * /opt/bitnami/letsencrypt/scripts/renew-certificate.sh 2> /dev/nullNow you are all ready to go with Let's Encrypt SSL certificates for your WordPress website. Start using your website without any issues and these SSL certificates will automatically generate themselves every 90 days.
Amazon CloudFront Setup
Now that we have set up an SSL certificate for our website, it is time to get it its own CDN. We will do that by using Amazon CloudFront which is very famous after Cloudflare.
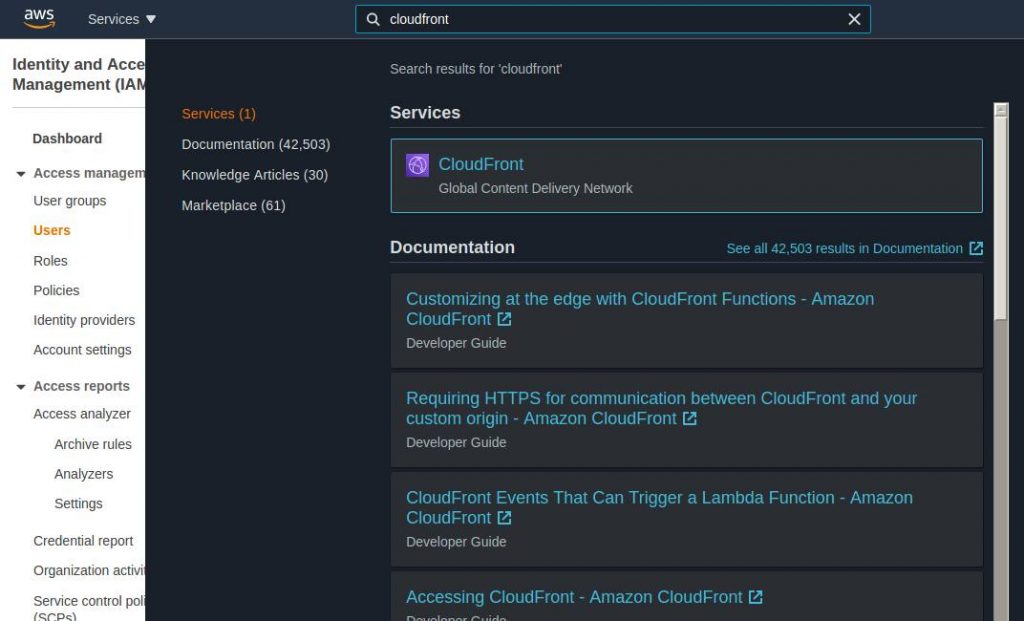
Before we go into CloudFront setup, we need to create an IAM user in AWS Console.
Log in to your AWS Console and on top bar search for IAM.
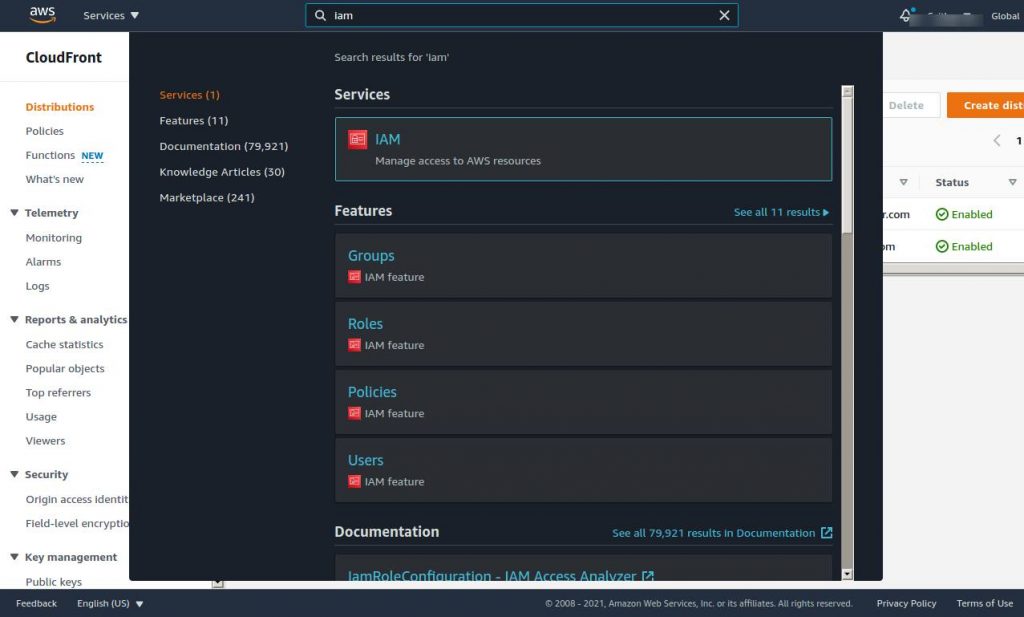
In the left panel, select Users and then press the Add Users button.

Give a username for this new user that we are creating. Select only Access key – Programmatic Access option and then press Next: Permissions button.
On the next page, select the tab that says Attach existing policies directly.
Search for “CloudFrontFullAccess AWSCertificateManagerFullAccess” in the search box and select both the policies that show up after the search.
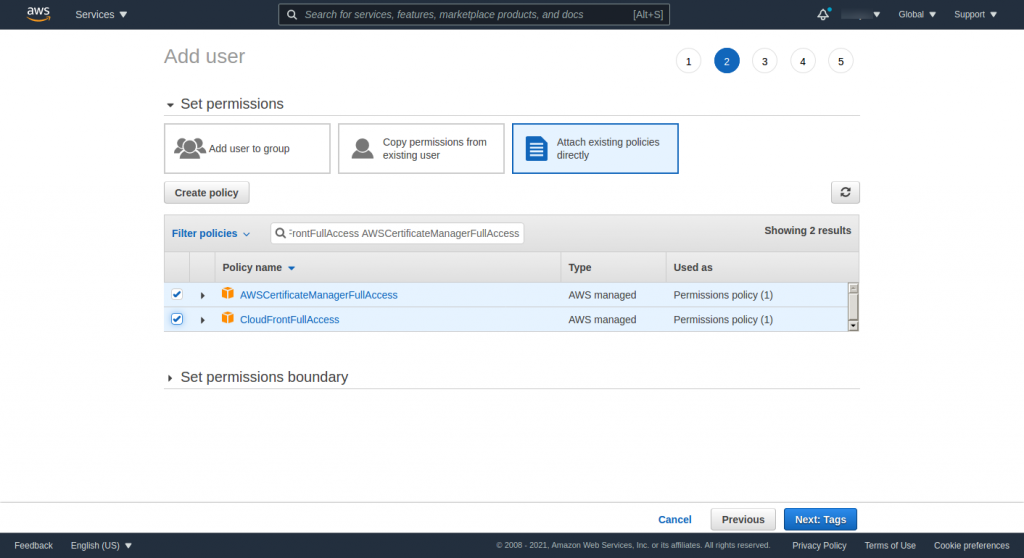
Press the Next:Tags button.
We don't need any tags for now as we are using this user for only CDN purposes.
Press the Next:Review button.
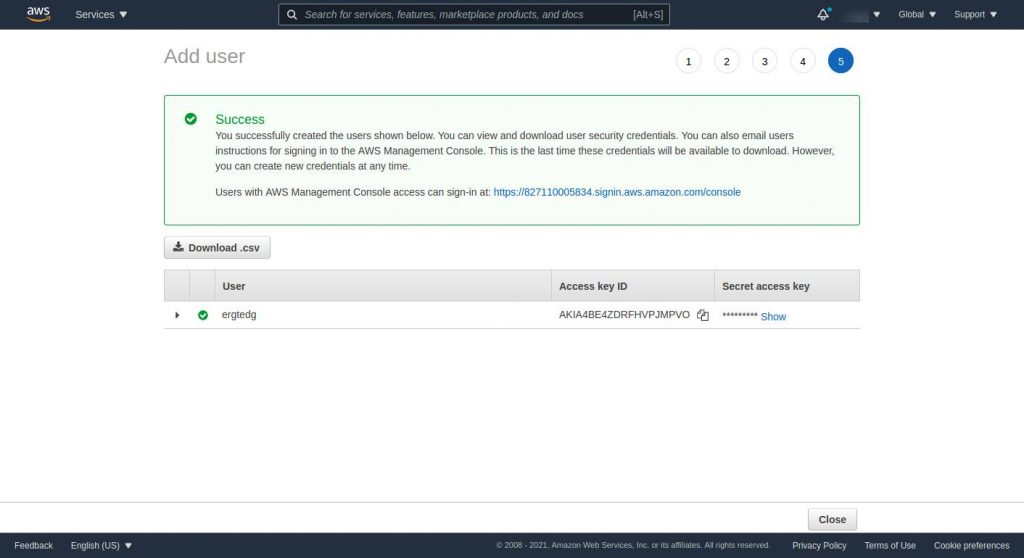
Finally, press the Create user button.
Once the new user is created, the page will also show Access key ID and Secret access key values. Copy these values and save them someplace safe as we need to use them in the following steps.
AWS CDN Plugin
It is time to get to our WordPress admin dashboard for further setup of Amazon CloudFront CDN setup for the WordPress website.
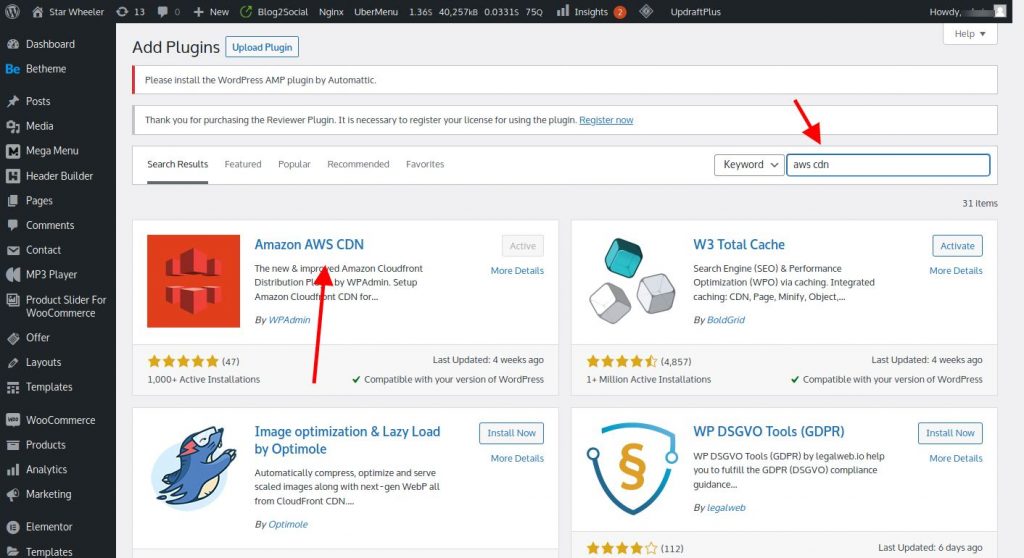
Go to Plugins > Add New
Search for the “AWS CDN” plugin.
Press the Install button and Activate button after it.
Once the plugin is installed, go to its settings page by clicking on its menu in the left bar of the WordPress admin dashboard.
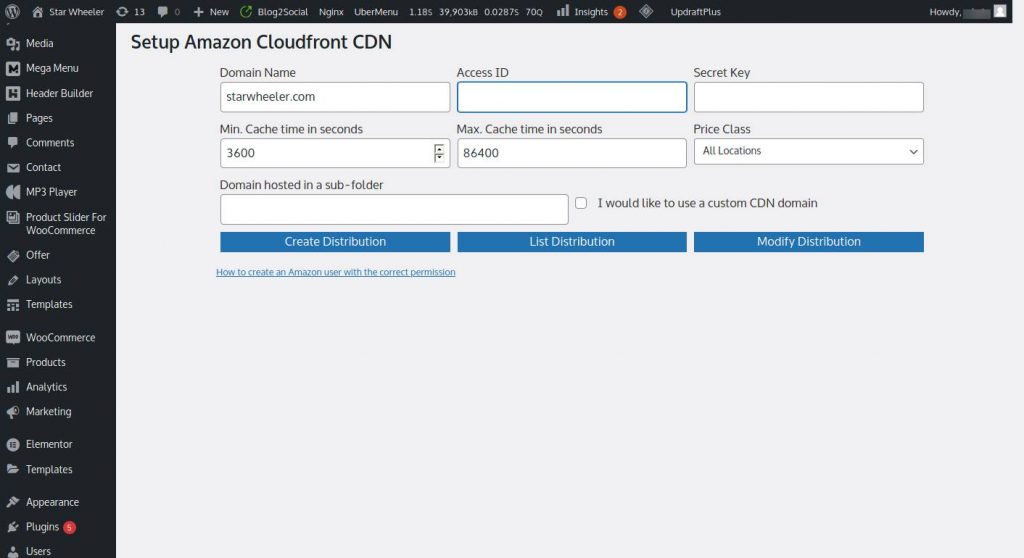
Input the Access ID and Secret Key we got in the above steps.
Select the I would like to use a custom CDN domain option. This will prompt more fields.
In the Custom CDN Domain, enter this
cdn. yourdomain . com
Press the Create Distribution button. This will take you to another page where you would require to verify the domain.
Follow these steps to verify your domain. The easiest way is to verify by Email option.
Once your domain is verified by AWS. You will be redirected to the original settings page. The value in the Certificate ARN field will be filled automatically.
Again press the Create Distribution button.

You will get a notification bar where you click on the Correct icon.

Now, this notice is asking you to reload the page. Click on the Reload the page link.
Once the page is reloaded, you will see a new page like this.
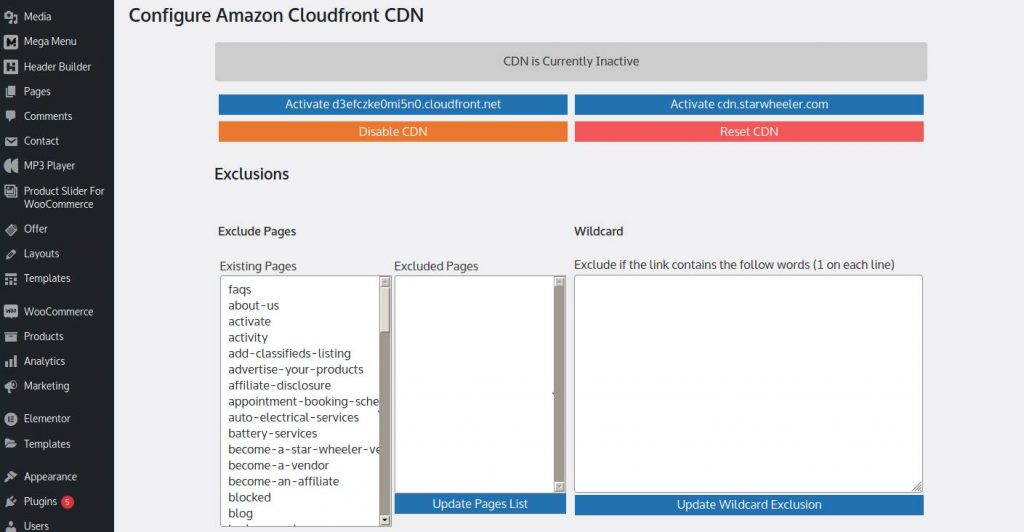
This means that you have successfully set up Amazon CloudFront CDN on your WordPress.
You do not have to do anything here. Move to the next step.
Setup Cloudflare DNS for your CDN domain
In the above step, you placed a custom domain to be used for your CDN. This custom domain needs domain mapping done right.
Before we go to Cloudflare setup, we need to get the newly set up CDN address from the above step from AWS Console.
Go to your AWS Console dashboard. Search for CloudFront and click on it.
Once you are on the dashboard of CloudFront in AWS Console, click on the newly created CDN Distribution.

You can verify if the distribution is for your domain by checking the origins column in the CloudFront dashboard.
Click on the distribution for your domain and copy the Distribution domain name address.
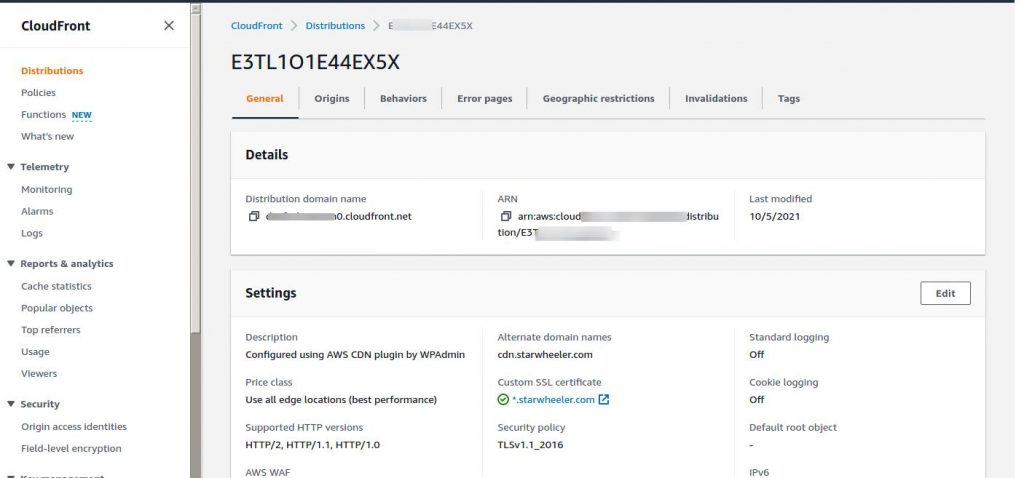
Save this distribution domain name address so that we can use it for domain mapping in Cloudflare in the next steps.
Now, log in to your Cloudflare dashboard. Go to your domain's settings. Check its DNS tab.
Press on the Add Record button. Put the following values.
- Type: CNAME
- Name: cdn
- IPv4 Address: xxxxxxx.cloudfront.net
- Proxy Status: Off (DNS Only)
Press the Save button. Once saved, it should look like this.
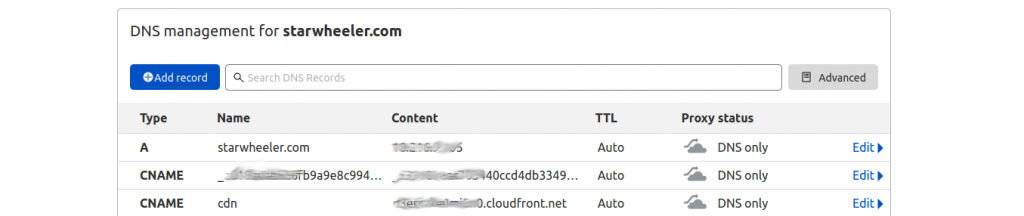
You are now done with the Cloudflare setup for mapping the subdomain of your website to CDN.
Using CDN with LiteSpeed Cache plugin
We are almost to the end of setting up a perfect architecture for our WordPress website hosting. A structure that will give you the fastest website speed even at high traffic times.
Go to your website's WordPress admin dashboard.
Go in Plugins > Add new, search for “litespeed”.
Results should show Litespeed Cache plugin as the first result.
Install and Activate the Litespeed Cache plugin.
Once the plugin is installed, go to the Litespeed Cache settings page. A new submenu in the left column will be added with the plugin name.
Go to Litespeed Cache > CDN.
Make sure QUIC.cloud CDN is OFF.
Switch ON the Use CDN Mapping. Put CDN URL as https://cdn. yourdomain. com
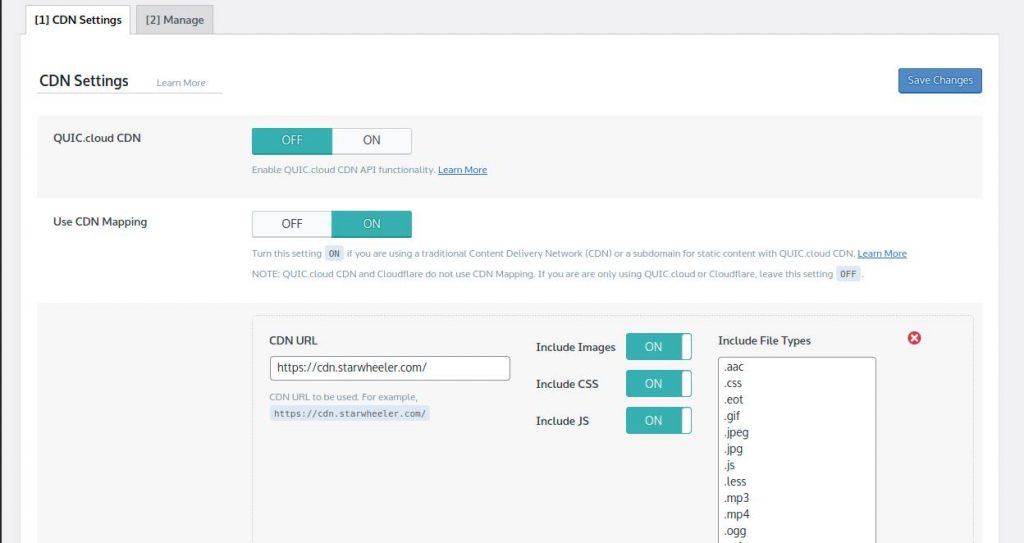
Put Original URLs as //yourdomain . com/
Keep Cloudflare API also in OFF mode.
Rest all the settings remain to their default.
Press the Save Changes button.
To check if the Amazon CloudFront CDN is working for you or not after following the above steps, go to your browser and open your website.
Right-click on any part of the page and select Inspect. This will open the console window for the webpage.
Go to the Network tab and reload your page again.
Now you will see all the list of scripts that were loaded by the browser. Place your mouse cursor on any of the js or CSS files and you will see the source of that file highlighted.
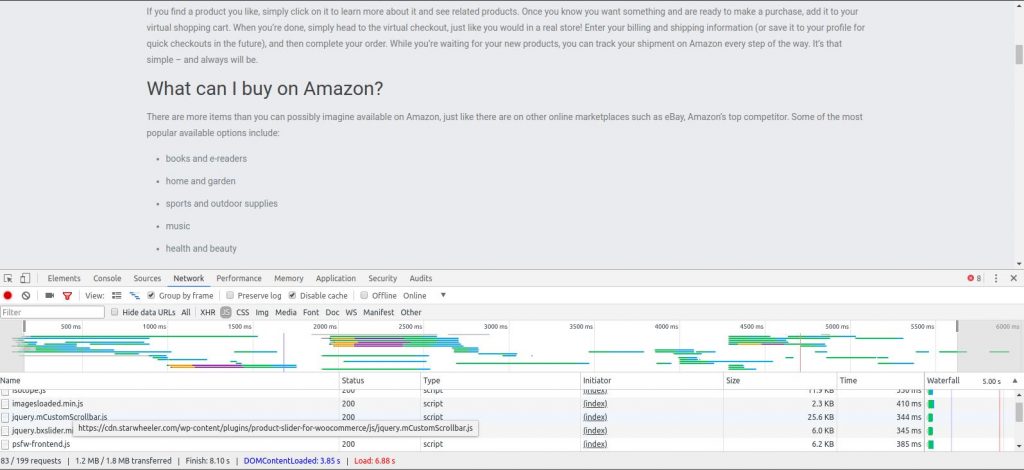
If the source of your JS and CSS files is from your specified CDN domain, then congratulations, your CDN is working perfectly well.
It is time to party!
Optimizing WordPress Website Cache
Now that we have set up everything well and completed the hosting architecture for our WordPress website, it is time to optimize the website a little further to use cache.
One of our favorite plugins for WordPress cache is the Litespeed Cache plugin. We have used this plugin with successful results for many of our client websites. Followed by W3-Total-Cache.
As we have already installed the Litespeed Cache plugin. Let us set the right values to get its best performance.
Go to Litespeed Cache > Cache settings page.
We will not be setting any values here for caching as Litespeed Plugin wants you to signup for their CDN services at QUIC.cloud or use a Litespeed server.
Since we are not using both, putting any values for the Cache settings of the Litespeed Cache plugin will not help. So we will move to other settings that will work.
Go to Litespeed Cache > Page Optimization in your WordPress admin dashboard.
In the CSS Settings tab, set these values.
- CSS Minify: OFF
- CSS Combine: OFF
- CSS Combine External and Inline: OFF
- Inline CSS Async Lib: OFF
- Remaining all settings to their default values.
In the JS Settings tab, set these values.
- JS Minify: OFF
- JS Combine: OFF
- JS HTTP/2 Push: OFF
- Load JS Deferred: OFF
In the HTML Settings tab, set these values.
- HTML Minify: OFF
- Load Google Fonts Asynchronously: OFF
- Remove Google Fonts: ON
- Remove WordPress Emoji: ON
- Remove Noscript Tags: ON
Press the Save Changes button.
Now this will get you the good page optimization settings for your WordPress install.
Since we are using the AWS Lightsail VPS server, we can use more resources of this server with the help of this cache plugin.
Go to LiteSpeed Cache > Crawler page.
In the General Settings tab, set the Crawler value to ON.
Go to Sitemap Settings next and put your website's sitemap address in the Custom Sitemap value.
By using a crawler for the website, the Litespeed cache plugin will crawl your website and cache its pages based on the website's sitemap.
This is helpful because your cache plugin will be ready with your website's web pages when someone visits it. In other cases, it will cache after the first loading of the website page.
Final Words
As you can see in this post series we wrote to migrate WordPress to a new hosting server, we have put a lot of effort to come up with the best way. If you liked our efforts, do comment and share these posts.
If you have found a better way than what we did here, we would love to listen to it. As programming and servers do not have a single way of solving things, there can be many ways to achieve the same solution.
Developing a WordPress website and maintaining them is a big task for any web development company. Thanks to our talented and experienced team members at UnderWP that we can take care of your WordPress development and maintenance work without any errors.
Check out our WordPress development service here: Professional WordPress Website Development Services
We would love to hear from you if you got any questions related to WordPress or Digital Marketing.
If you need any other topic to be written on our blog, do comment and let us know below.
Read the other parts:
- Migrating WordPress Website To Lightsail On AWS – Part 1
- Migrating WordPress Website To Lightsail On AWS – Part 2
- Migrating WordPress Website To Lightsail On AWS – Part 3


Hi.
Great and detailed explanation. Thanks a lot.
I just have 1 question though. As far as I understand, in order for Litespeed features to work (especially the cache features) the server where the site is hosted has to be a Litespeed server. How can you make this features work now that the site is in a Lightsail server?
Thanks
Hello Raul,
Good question.
The Litespeed cache plugin is independent of the kind of server you are using. It will work with any kind of server like Apache, Nginx, etc. The plugin has been designed to work independently from the type of server it is used with. It works more with PHP than the server level cache. But if you have a Litespeed server, it will perform well by tuning the Litespeed server rules for the website.
I have found the LiteSpeed Cache plugin to be more effective than some of the paid plugins out there for WordPress. The name includes Litespeed but it does not require a Litespeed server to work on.
A very well written guide on AWS lightsail for new WordPress newbies like me. I think this is the most complete and up to date tutorial I have seen on this topic. Most of the other tutorials are in parts and you have to keep searching on Google to find the missing parts.