
Want to send an email from your WordPress site, but you don't want to use your web host's email delivery service or an expensive SaaS solution? I've got an option for you that costs nothing.
WordPress does not allow you to send emails when you have configured a new blog. Instead, it asks you to set up an email account. That's fine, but not everyone wants to do that.
WordPress emails can only be delivered via SMTP if you have your own dedicated server or a co-located server with a full-time connection to the internet.
If you are short on money and would still like to send WordPress emails using Gmail SMTP, this article is for you.
Why Gmail SMTP?
Did you know you can use Gmail to send your WordPress emails? Yes, it's true. There are a lot of reasons why people want this. Maybe you don't like managing a complicated email service like Mailgun or Mandrill. Or maybe you just want to use the email service you already own. Whatever the reason, it does work and I'll show you how!
Gmail is the world's favourite email application, boasting more than 1 billion users and counting. In addition to serving as a powerful email hub, though, it can also be used with WordPress to send automated emails from your blog or website.
And it's FREE!
But it has some limitations too. You cannot use it to send spam emails as Google's system is smart to block your credentials from doing that.
If you have a small to medium-size business website with less than 1000 subscribers or mails to be sent in a month, then Gmail can be used efficiently.
WordPress Mail SMTP Gmail Setup
If you're in need of a WordPress plugin to help you send email through Gmail SMTP, then look no further.
Post SMTP is a simple PHP class that bridges the gap between your WordPress site and your Gmail account, helping you to avoid the monthly allotment restrictions of your typical web host.
Have you ever encountered an error like this:

Server error. Form not sent. An error occurred.
This error is usually seen with Elementor forms. When the SMTP server is not configured correctly on the hosting server, this error is usually seen.
Shared hosting WordPress websites rarely see this kind of error with Elementor contact forms. Because they have configured the PHP to use a secured outgoing SMTP port.
If you have set up your server on a VPS or AWS or followed our AWS lightsail WordPress setup tutorial, then you will see this error with your Elementor forms. Other kinds of WordPress forms will show similar errors too.
But not to worry, we have written this detailed post to help you solve this error with ease. If you face any kind of problems in any setup, use the comment form below and let us know your questions.
Also if you are looking to get professional WordPress development services for yourself do not forget that we also offer these services.
To set up the WordPress Mail SMTP with Gmail, you need to have API access to Gmail API. It might sound complicated but we have tried to make it as simple as possible in this post.
Step 1: Install Post SMTP plugin.
Go to your WordPress Dashboard > Plugins > Add New.
Search for “Post SMTP“.
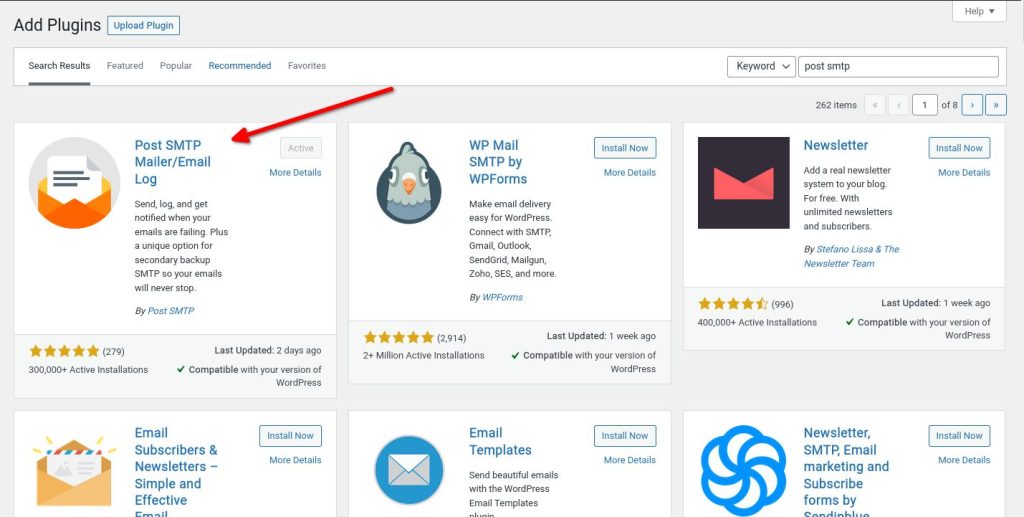
Click the Install button and then the same button to Activate the plugin.
Step 2: Send a Test Email.
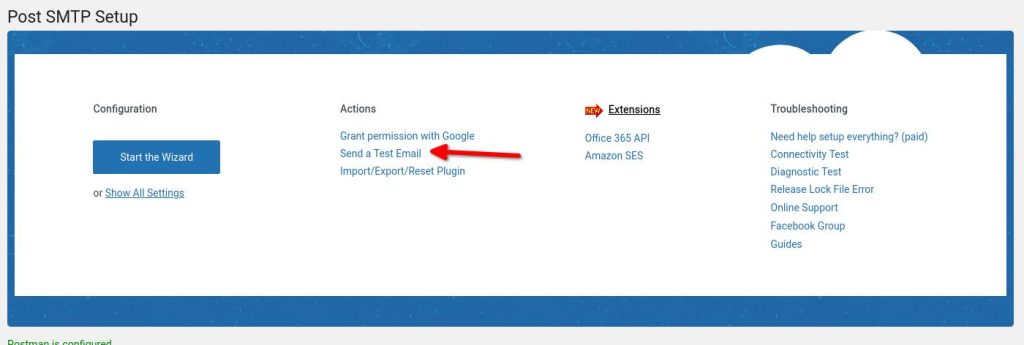
Once the Post SMTP plugin is installed, go to its setting pages.
On the main Post SMTP settings page, you will see the option to Send a Test Email. Click on this link and see if you can send an email.
In most cases, it fails to send the email from your WordPress website. It's Ok. We are just testing and checking if your server has any port configured to send the PHP mail.
When sending the test email fails, go to the Email Log section of the Post SMTP plugin.
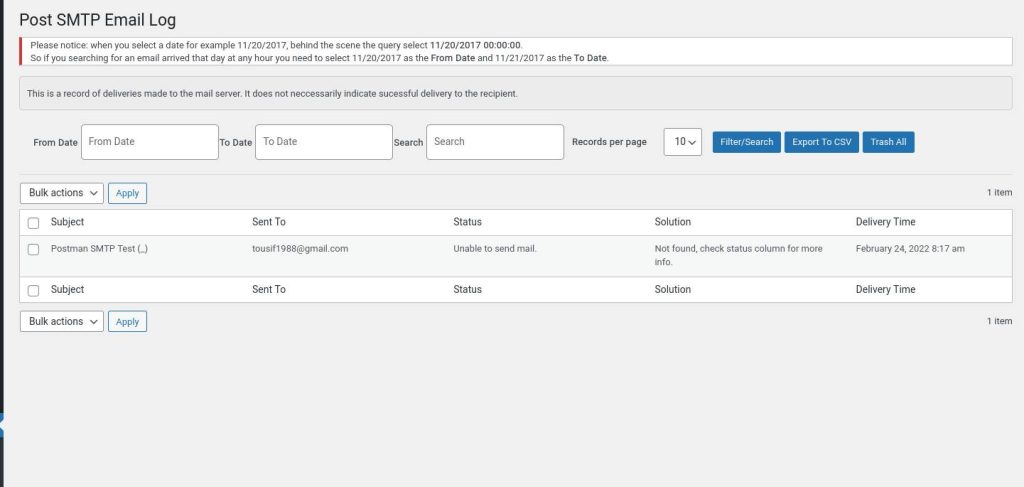
In the list, you will see the name “Postman SMTP Test“. When you hover above this link, below you will see the option “Session Transcript“. Click on this link and you will see a popup like this.
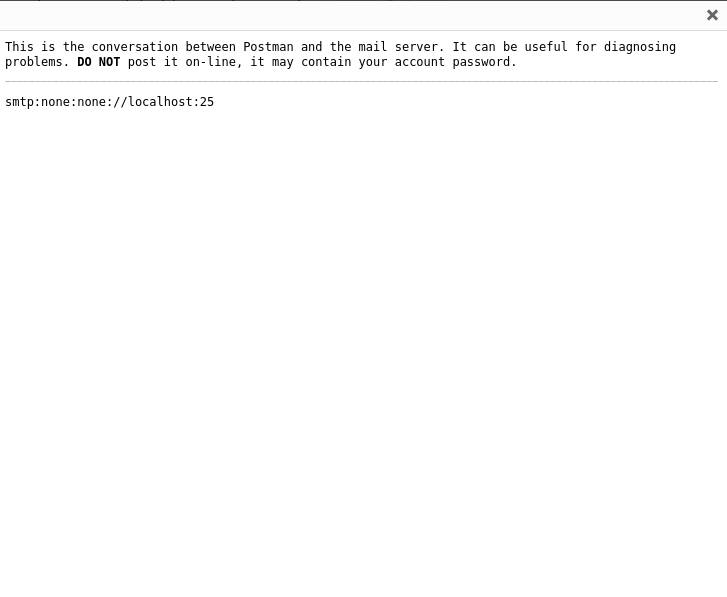
This shows that the server is configured to use 25 ports for outgoing mails. Next, we will fix this by using the Gmail SMTP.
Step 3: Setup Post SMTP plugin for Gmail
Now we will set up the Post SMTP plugin and get the required details for getting the API credentials from the Google Cloud Platform.
Start The Wizard For Setup
On the Post SMTP main settings page, there is a big button called “Start the Wizard”. Click on this button and you should see the below page.
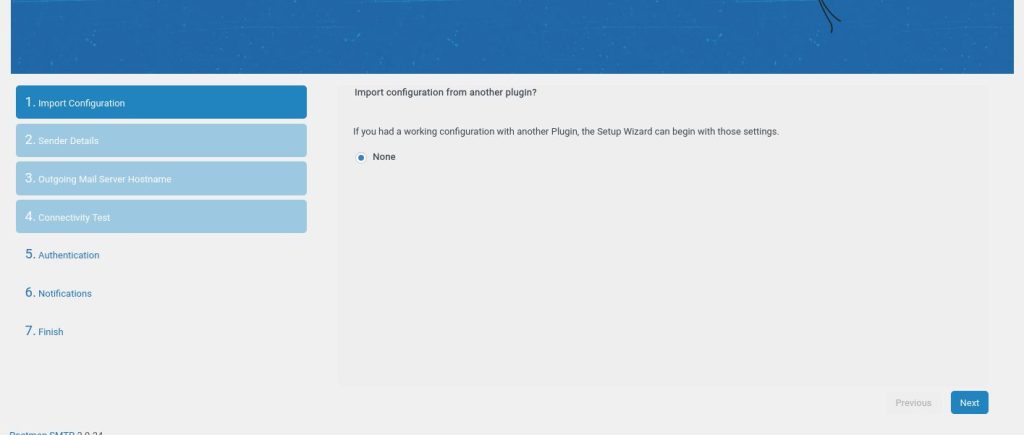
In the first step of Import Configuration, click the Next button.
Sender Details
In this step, fill out your Gmail id in the Email address section. In the Name field, fill out the name that you want to be displayed as your Email name.
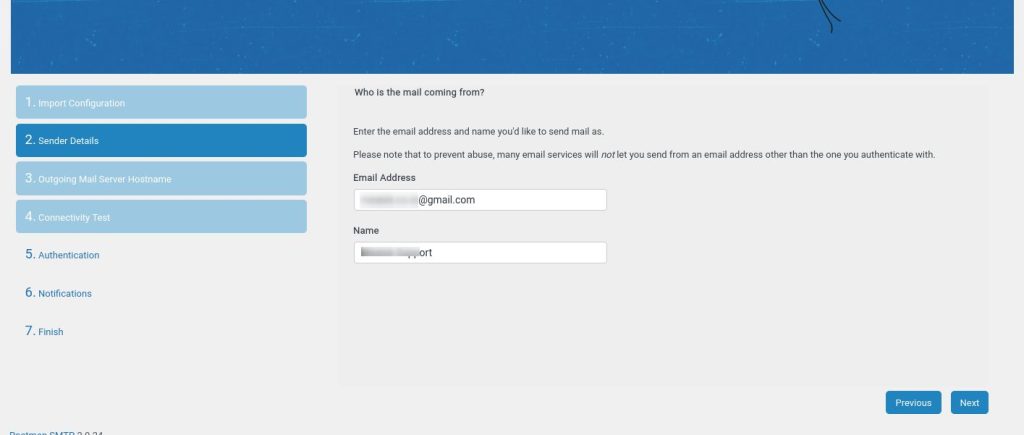
Go to the next step by using the Next button.
Outgoing Mail Server Hostname
In this step, you do not need to do anything. Just wait a few minutes until the plugin finds the correct SMTP address of Gmail.
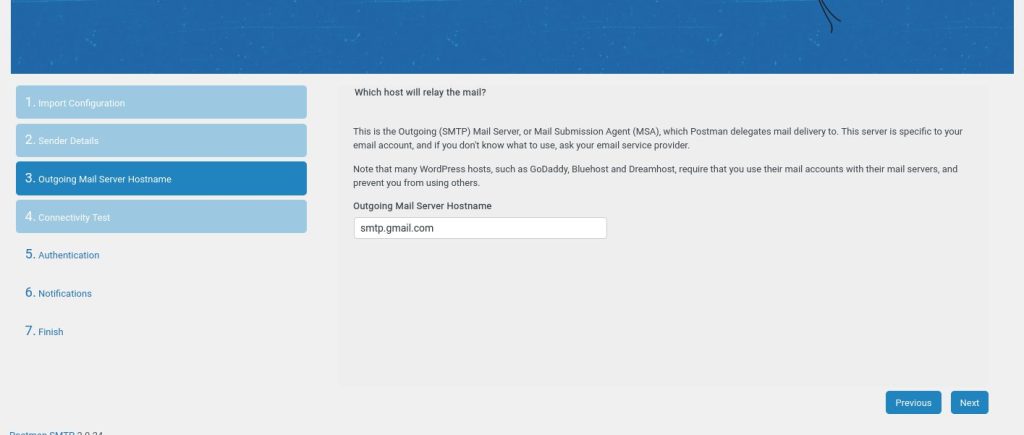
Press the Next button
Connectivity Test
In this step again you will be required to wait a few seconds until the script finds the correct ports available for the Gmail SMTP server.

Select the SMTP – gmail.com:587 as your selection. This port is the best for working for Gmail from PHP scripts. Let the Authentication part be OAuth 2.0. The password option sometimes gets errors as Gmail is very strict with web applications accessing its API using on username and passwords. Go to the next step using the Next button.
Authentication
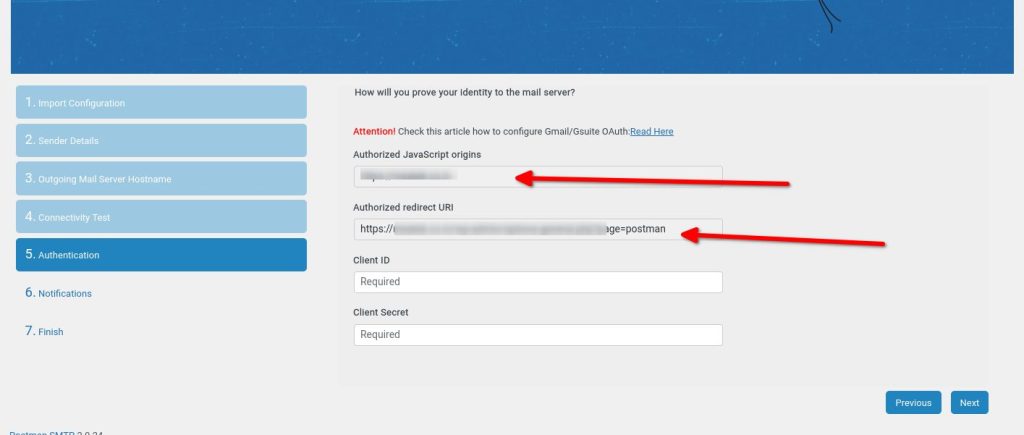
Note the two important details from this step. Authorized Javascript Origins and Authorized redirect URI. Keep This page open and open a new tab to start the Google Cloud Platform and get the Gmail API details.
Google Cloud Platform Setup For Gmail API
If you have followed the above steps and reached here then it is time to deal with the Google Cloud Platform. Open it in a new tab of your web browser.
Step 1: Sign In to the Google Cloud Platform with your Gmail ID
You can use the same Gmail ID that you want to use with your WordPress website to send emails. Once logged in you should see the Google Cloud Platform dashboard.
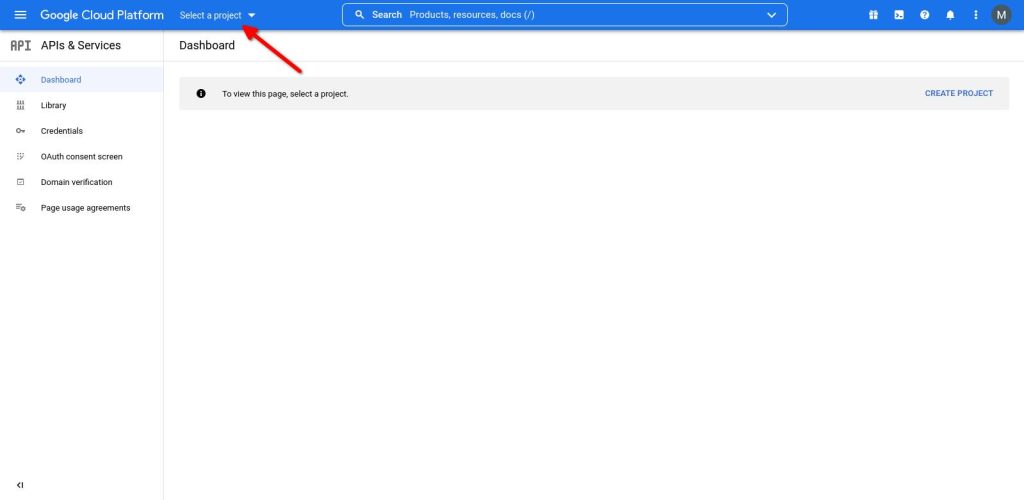
On the top of the Google Cloud Platform Dashboard, you will see the selection box called “Select A Project“. Click on this and you should see a new popup like this:
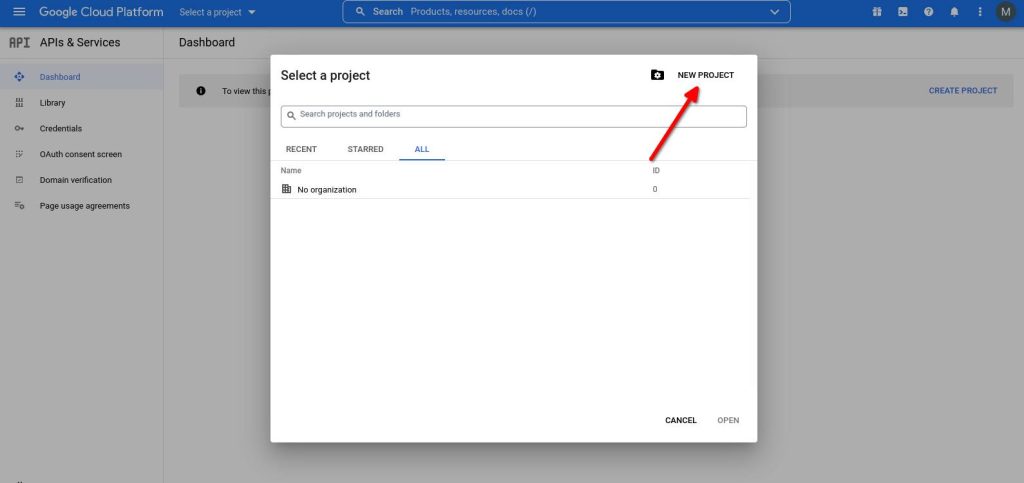
Click on the “NEW PROJECT” button in this popup.
Step 2: New Project Details
Now you should have reached the New Project setup page.
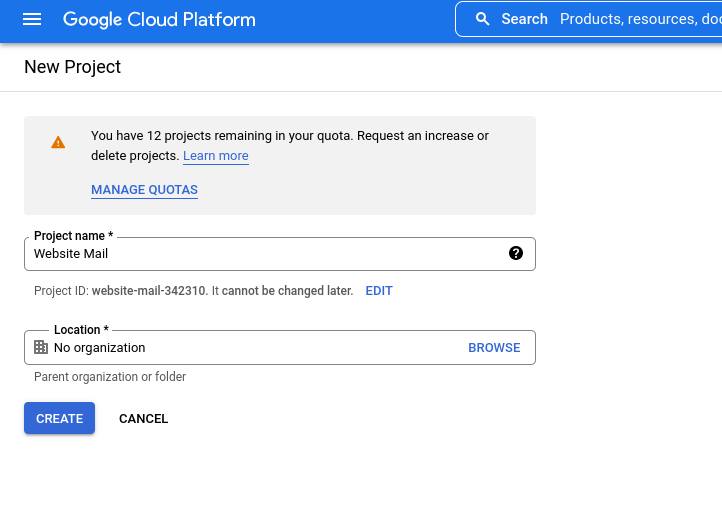
Fill up the Project Name and Location fields here.
No organization option in the Location field will work here and be accepted by the Google Cloud Platform. You do not need to create a new organization.
Step 3: APIs & Services
Once you fill in the new project details you will be redirected to the APIs & Services page as shown below.

On this page click the + ENABLE APIS AND SERVICES. You will be redirected to the APIs search page that looks like this:
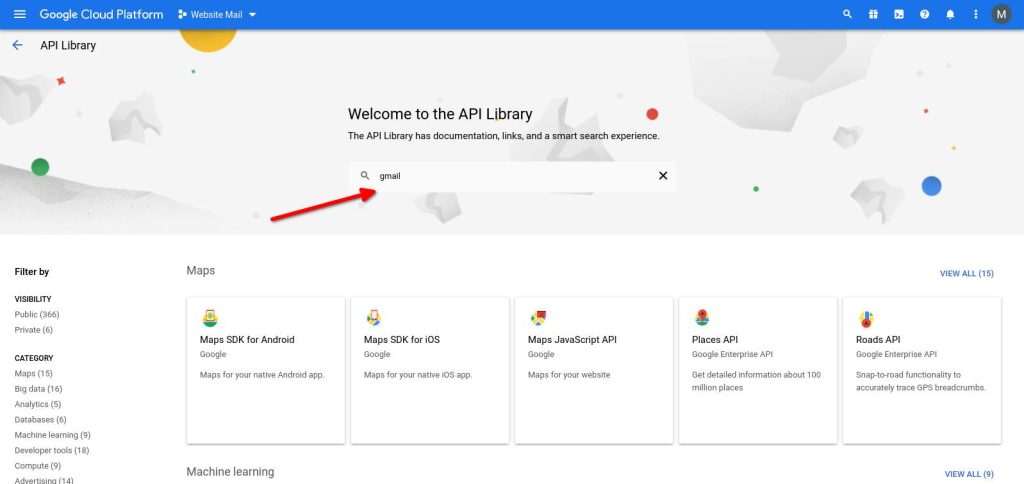
On this page search for Gmail.
You will get 2 results for Gmail search.
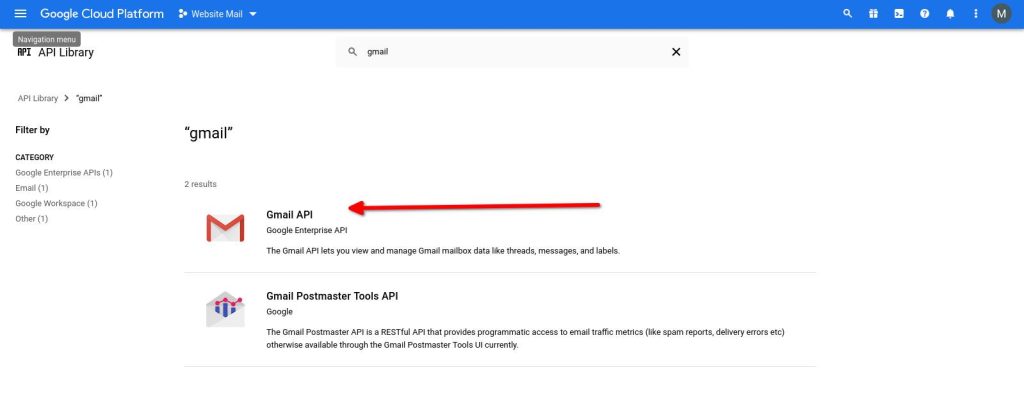
Select the Gmail API.
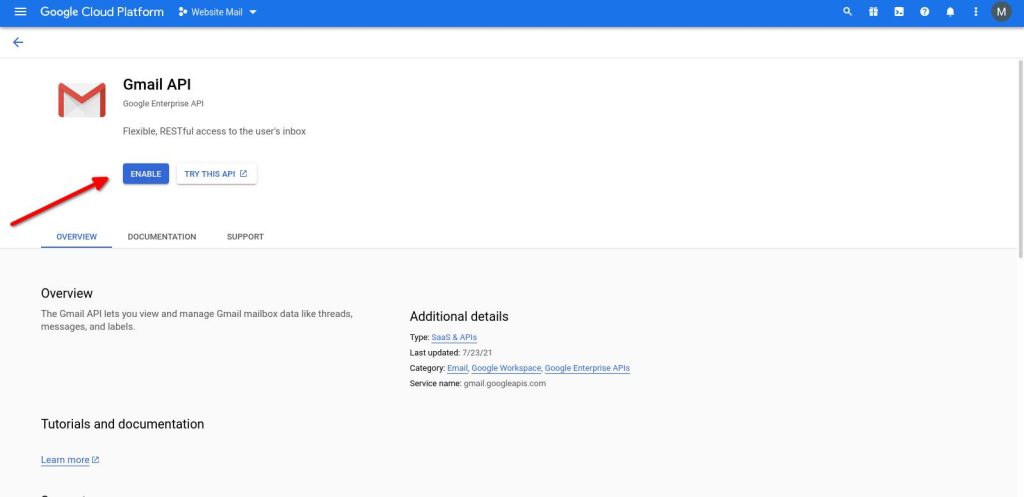
This will open the Gmail API description page. Click the ENABLE button here.
Step 4: Gmail API Credentials
Once you enable the Gmail API on your Google Cloud Platform you will be redirected to the Overview page.
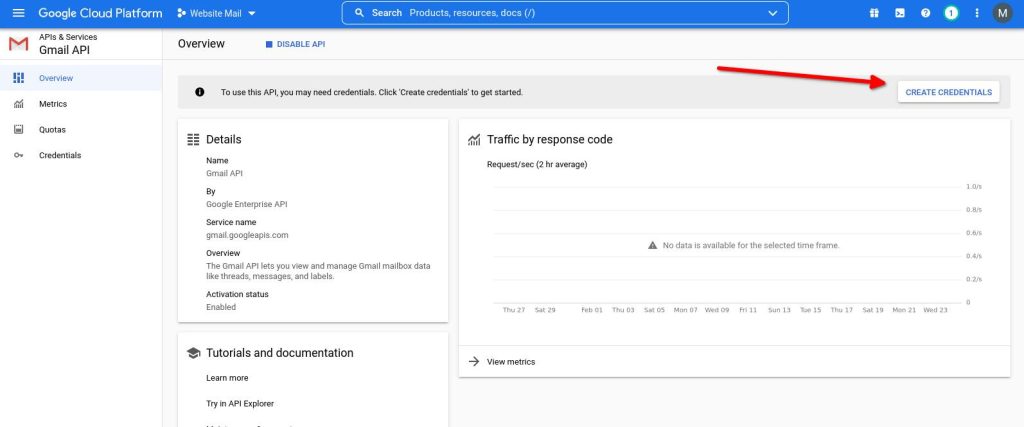
On the right side, you should see a button called CREATE CREDENTIALS button. This will open the Create credentials page.
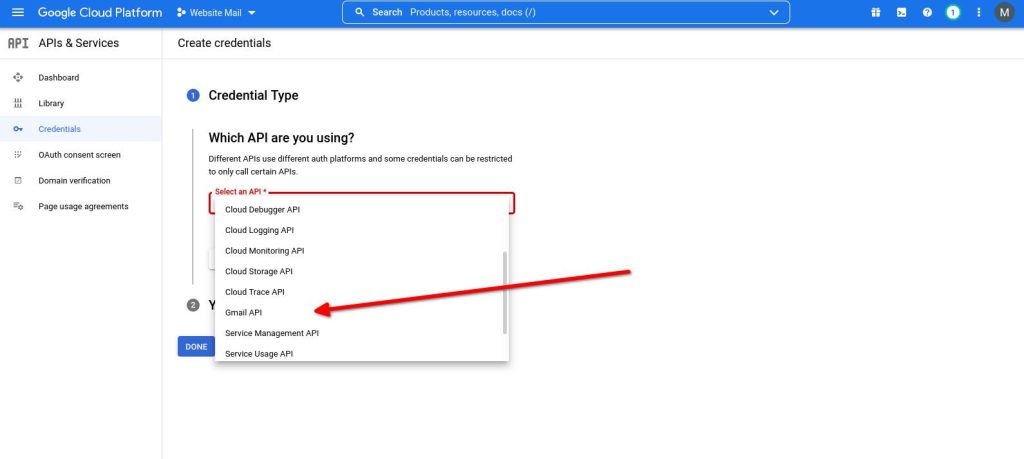
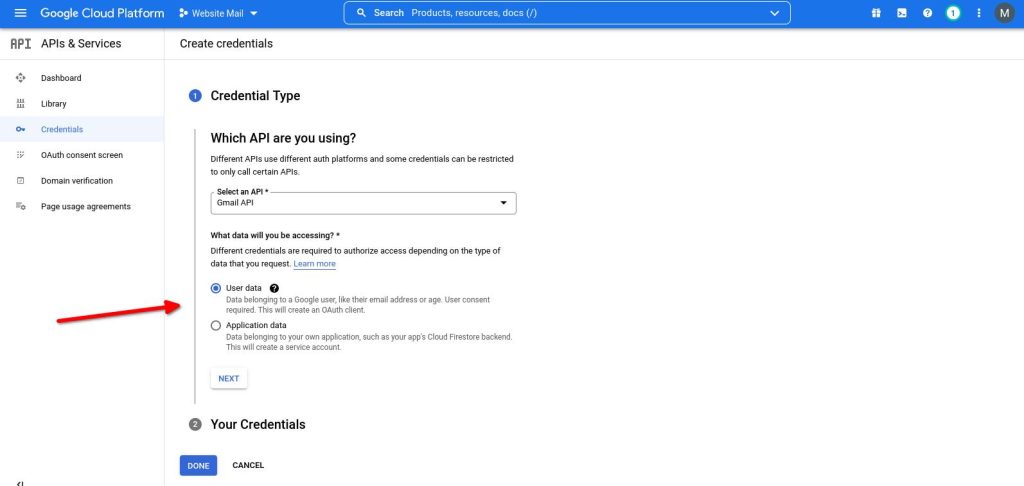
In the Credential Type step select the Gmail API option.
And then select the option User data and press the Next button.
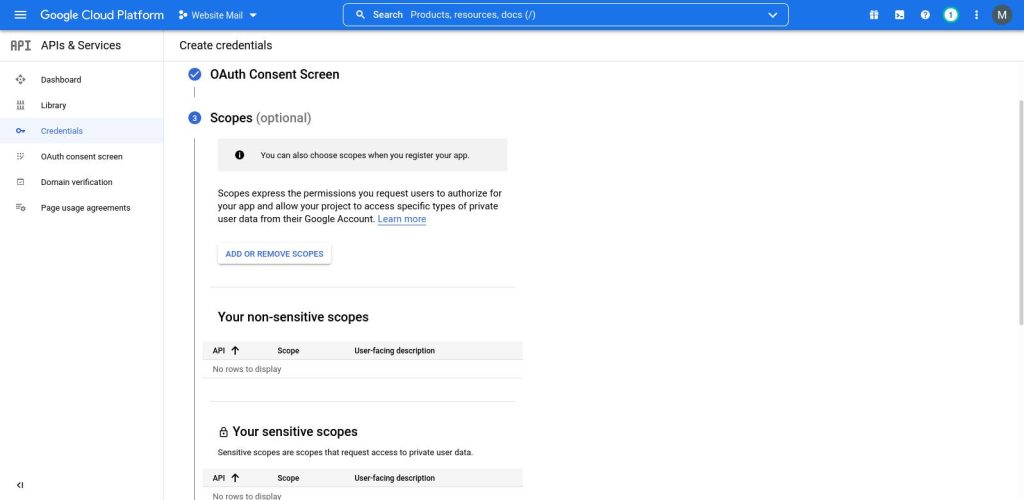
In the Scopes step, you do not need to do anything as it is only optional. Just press the Next button here.
On the next page, it will ask for OAuth consent screen details. Fill the details with your website name in the app name box. Put your Gmail id in the User support email that you want to be contacted for any errors or support from Google.
Put your personal email id in the Developer contact information field. Any email id will work here.
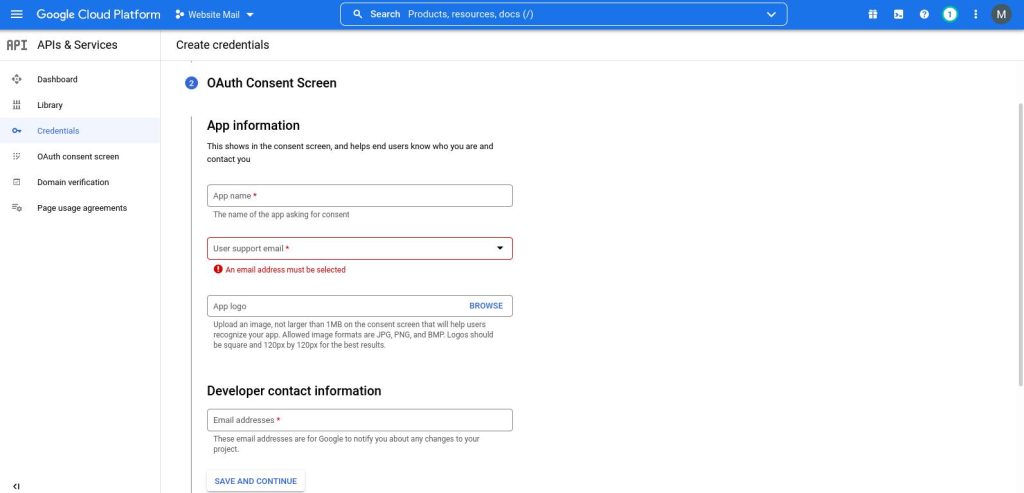
Press the SAVE AND CONTINUE button.
This will now open the OAuth Client ID section. A very important section.
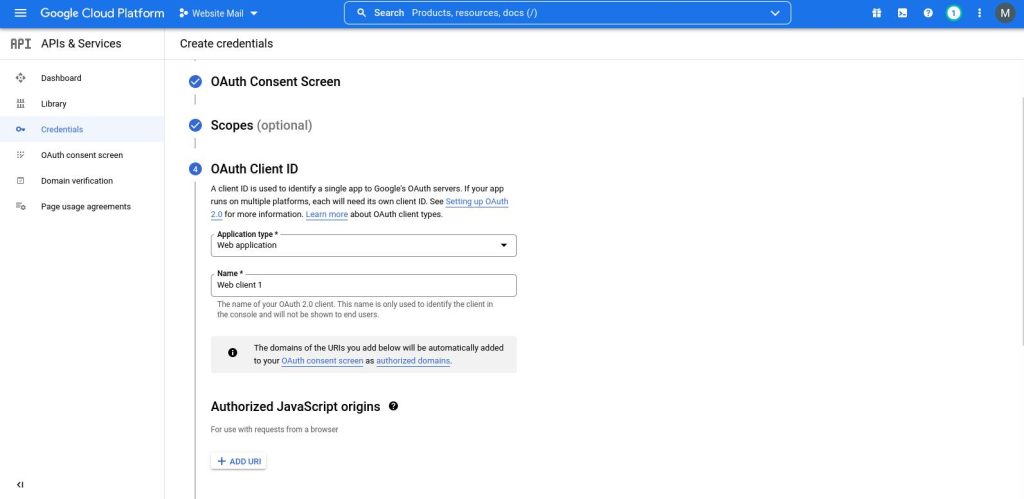
Select the Application Type as Web Application. Give any name in the Name field.
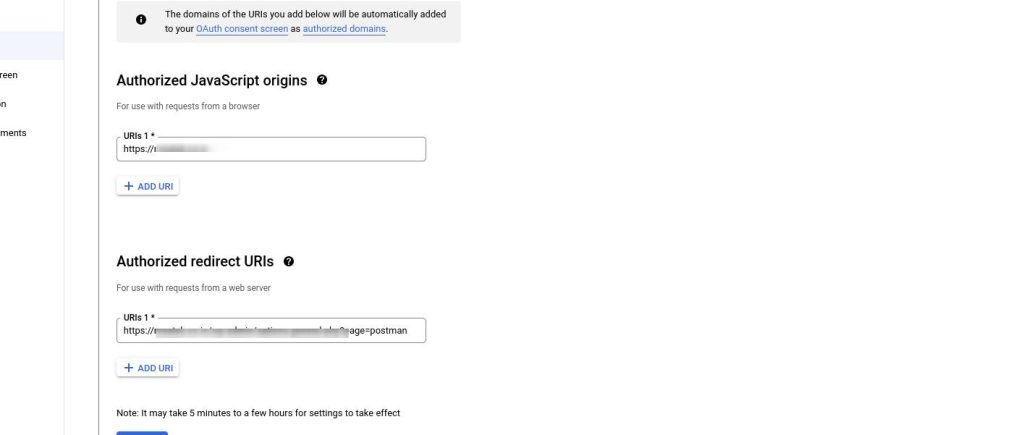
In the Authorized Javascript Origins press the ADD URI button and add the URL we saved from our WordPress Post SMTP setup page in another tab.
Also, put the Authorized Redirect URl value.
Press the Next button to get the Gmail API credentials created by Google Cloud Platform.
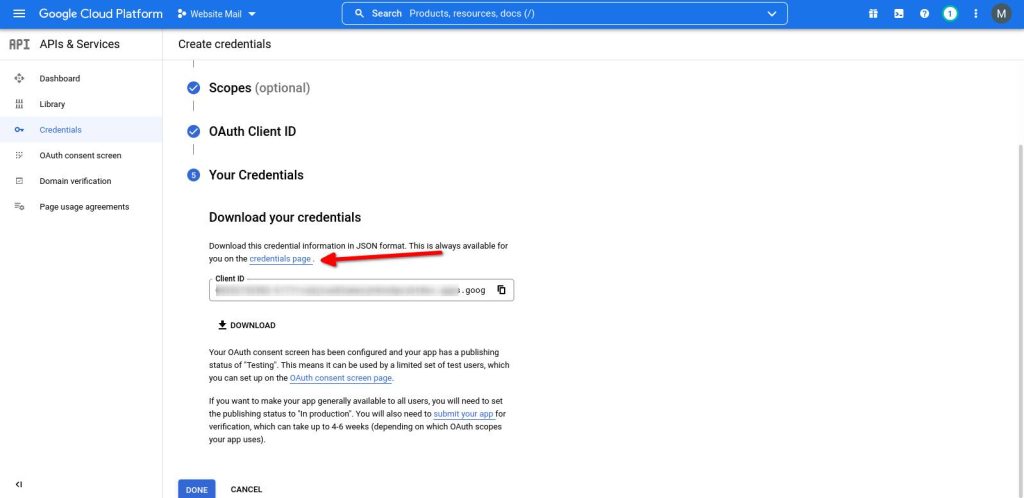
You will now see the Your Credentials section with your Gmail SMTP API. But here only the Client ID will be shown. To see the client secret key, press the credentials page link as shown above.
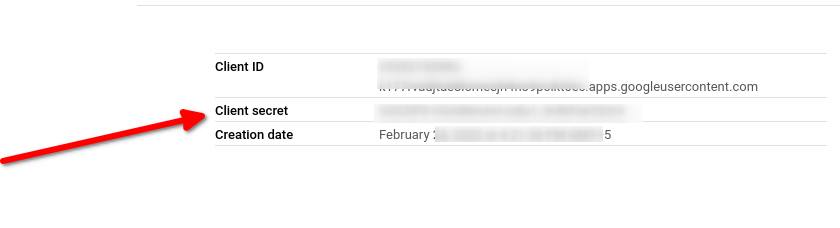
On the Credentials page on the right column, you should be seeing the Client ID and Client Secret details that need to be input in our Post SMTP setup page. Copy and paste accordingly.
Once you input the Client ID and Client Secret keys on your WordPress website with the Post SMTP setup page, press the Next button.
Step 5: Notifications
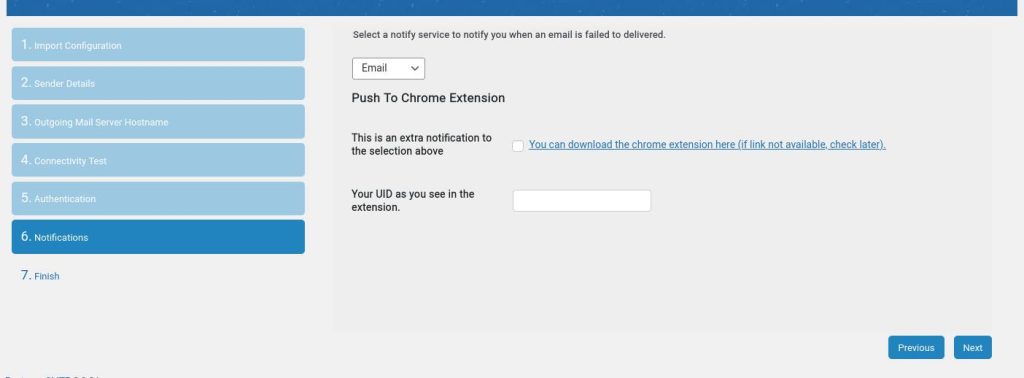
This step is optional and you can just press the Next button here.
Step 6: Finish

We are almost to the end of the setup. This page just gives you the final notice.
Press the Finish button on this page. This is just the plugin setup finishing, we have a few more steps ahead!
Step 7: Grant permission with Google.
Once you press the Finish button from the above step you will be redirected to the main Post SMTP page where you can see the Grant permission with Google link.
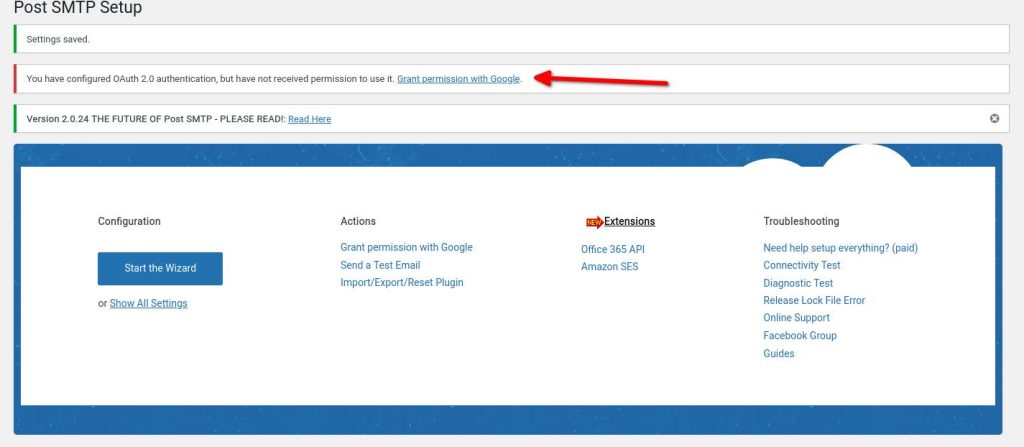
Click on this link and you will be redirected to the Google sign-in page. Select your account here and press the next button.
You will see an Authorization Error page like this:
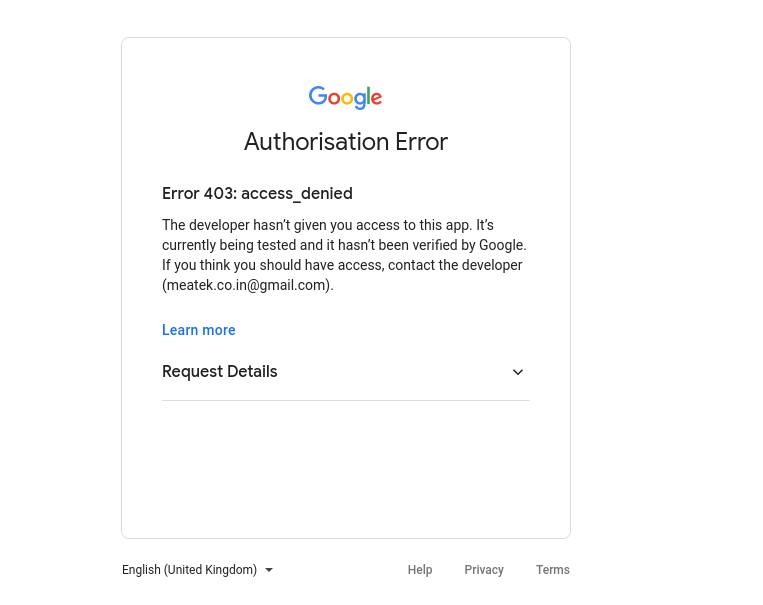
This means that we have one more step to complete on the Google Cloud Platform API page. Go back to your Google Cloud Platform page and open the OAuth consent screen.
You will see that the Publishing Status is pending and the button PUBLISH APP is not active. Click on this button and make it active. You will see a pop up like this:
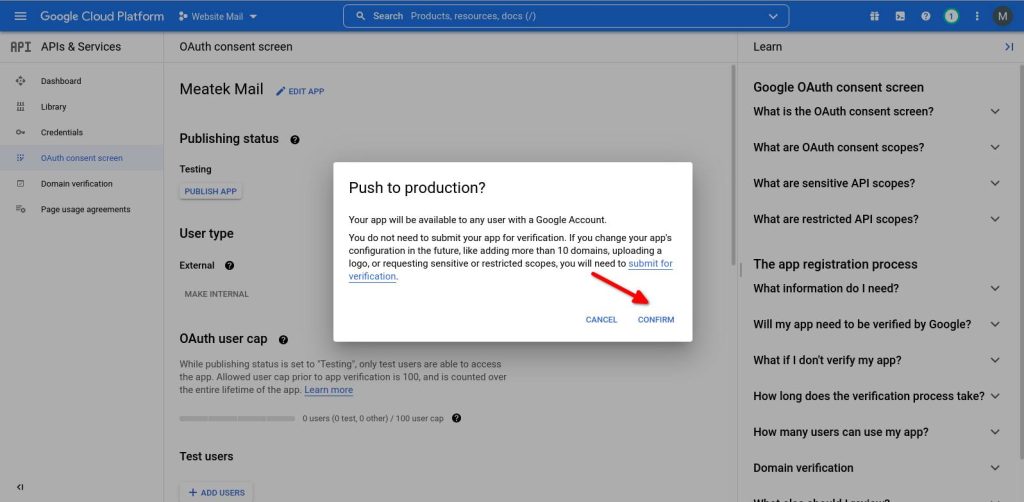
Press the CONFIRM button here.
You will see that Verification Status now showing as Verification not required. This is good news because you do not have to go through the verification steps of Google just to use the Gmail API. Believe me it's a very lengthy process!
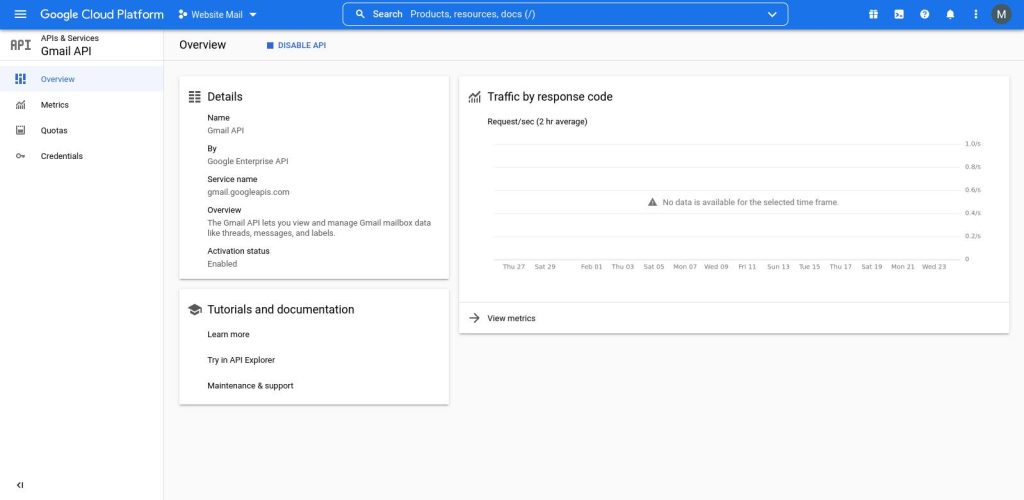
You should now see the Gmail API overview page. The Activation Status should be Enabled here.
Now go back to your WordPress Post SMTP settings page where we started at the beginning of this step.
Click on the Grant permission with Google link again and follow the same process. The error we saw at the beginning of this step should have been gone now and you should see a warning page like this. (If you still see the Authorization Error or Request Error page here, just wait a few minutes until Google Cloud Platform updates its API settings. This will take from a few minutes up to 30 minutes.)
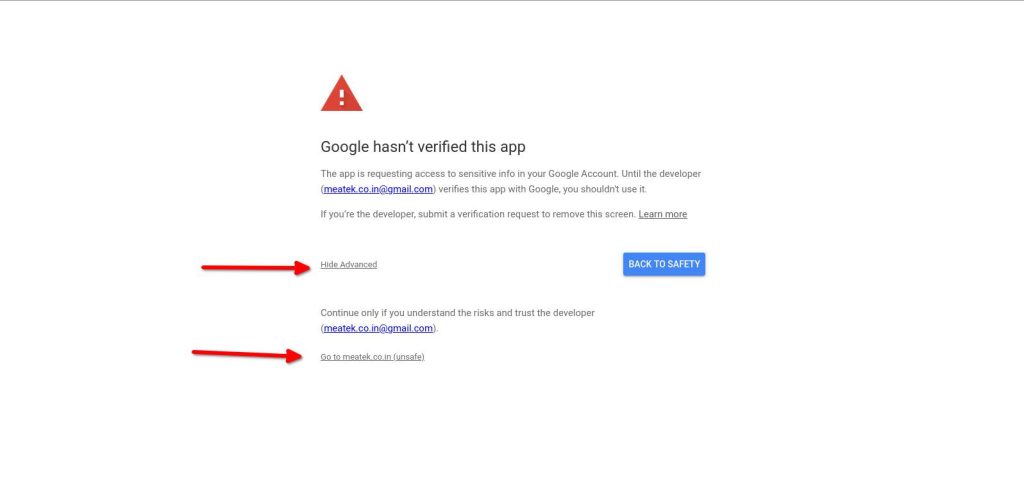
Click on the Show Advanced link and then click the Go to [yourwebsiteurl] (unsafe) link.
This should redirect you to the permissions approval page.

Click on the Continue button here and you should be redirected back to your WordPress dashboard of Post SMTP main settings page.
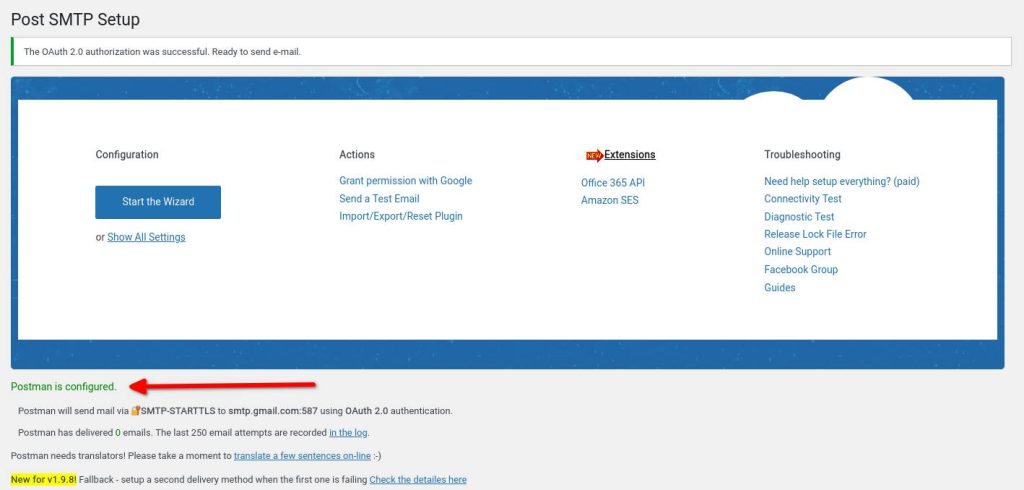
On this page, you should see the Postman is configured notice in green colour. This is good news and we have successfully finished setting up the Gmail SMTP integration with our WordPress website.
Now you can send your WordPress website emails using your Gmail account with ease and free.
Final Words
This is a long setup process for using the Gmail SMTP API of Google. But it's completely worth it.
You get to use Gmail to send and receive emails for your website. And we all know how easy it is to use Gmail. Plus it's a free email service.
Follow this tutorial step by step and set up Gmail for outgoing emails of your WordPress website.
Show us some love by subscribing to our newsletter and commenting below to keep us motivated to write more such tutorials.


A very well written detailed guide on the SMTP problems of WordPress. Kudos.
I followed all the steps you wrote and it helped me fixed the email SMTP problems that I faced whenver I install a WordPress website for my clients. I will keep this as a reference guide for all my future install of WordPress websites. Also easy to follow.